Integrating Dandelion Datatables In The Spring Petclinic App
Petclinic is one of the sample applications created by SpringSource to demonstrate the key features of the Spring Framework.
We recently had the opportunity to integrate Dandelion-Datatables into this app. Here is a tutorial describing how it has been done, step by step.
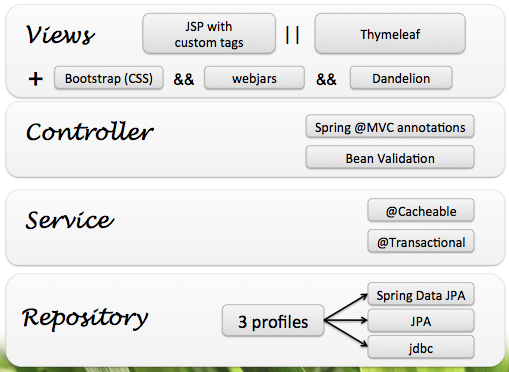
Technically speaking, we’ll focus on the view layer, i.e. where Dandelion-Datatables mainly comes into action in this use case.
Before starting, note that : * the source code is available on GitHub * you can access the live demo on Cloudfoundry * Michael Isvy from SpringSource has written an article about the new Spring PetClinic app in the SpringSource blog and has made available some slides
#### Step 1 : collecting information
The first thing to do is to gather information in order to know what dependencies will be needed.
- what template engine is being used?
Dandelion-Datatables provides a JSP taglib and a Thymeleaf dialect, allowing you to use both template engines.
In our case, the Petclinic app is based on plain old JSP.
- what version of the servlet API is being used?
By default, Dandelion-Datatables takes advantage of one of the key features added in the Servlet 3.x API (JSR 315) : configuration through annotations, allowing us to qualify some classes as a Servlet or a Filter. This way, no need to manually update the deployment descriptor ( web.xml ) any longer.
Note that currently, the Servlet 3.x API is supported by almost all application servers in their latest version. For example Tomcat 7.x or JBoss AS 7.
In our case, in order to keep a backward compatibility with a large majority of legacy app servers, we’ll use the datatables-servlet2 extra.
#### Step 2 : updating the dependencies
Since the build of the Petclinic app is based on Maven, let’s add the needed dependencies in the pom.xml.
<dependency>
    <groupId>com.github.dandelion</groupId>
    <artifactId>datatables-jsp</artifactId>
    <version>0.8.11</version>
</dependency>
<dependency>
    <groupId>com.github.dandelion</groupId>
    <artifactId>datatables-servlet2</artifactId>
    <version>0.8.11</version>
</dependency>
#### Step 3 : updating the deployment descriptor
Since we want to keep backward compatibility with legacy app servers, we need to update the web.xml by adding the Datatables’ servlet definition.
<!-- Dandelion-Datatables servlet definition -->
<servlet>
    <servlet-name>datatablesController</servlet-name>
    <servlet-class>com.github.dandelion.datatables.extras.servlet2.servlet.DatatablesServlet</servlet-class>
</servlet>
<servlet-mapping>
    <servlet-name>datatablesController</servlet-name>
    <url-pattern>/datatablesController/*</url-pattern>
</servlet-mapping>
#### Step 4 : replacing plain old HTML tables with DataTables
At this point, we’re done regarding the Dandelion-Datatables configuration. Now we just have to update the JSPs that use the plain old table and use the Dandelion-Datatables taglib instead.
In the Petclinic app, there are two contenders : the list of owners (ownersList.jsp) and the list of vets (vetList.jsp).
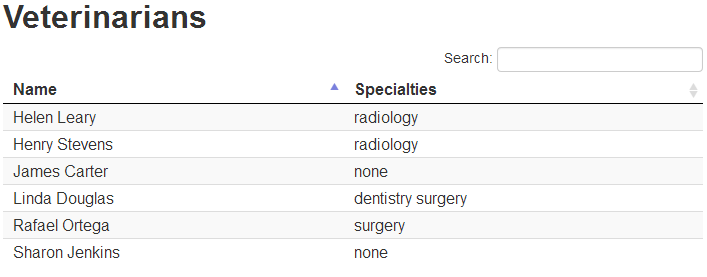
Let’s start by the easiest one : the list of vets.
##### vetList.jsp
The JSP currently uses the typical JSTL c:forEach tag to iterate over a collection of vets and generate HTML tr tags.
<table class="table table-stripped" style="width:600px;">
    <thead>
        <tr>
            <th>Name</th>
            <th>Specialties</th>
        </tr>
    </thead>
    <tbody>
    <c:forEach var="vet" items="${vets.vetList}">
        <tr>
            <td><c:out value="${vet.firstName} ${vet.lastName}"/></td>
            <td>
                <c:forEach var="specialty" items="${vet.specialties}">
                    <c:out value="${specialty.name}"/>
                </c:forEach>
                <c:if test="${vet.nrOfSpecialties == 0}">none</c:if>
            </td>
        </tr>
    </c:forEach>
    </tbody>
</table>
Before adapting the above table, note some items :
* the table looks pretty nice thanks to the awesome Bootstrap library
* a CSS style is directly set using the HTML style attribute
Now, let’s use Dandelion-Datatables!
The first thing to do, as for any other taglib, is to import the TLD using the taglib directive
<%@ taglib prefix="datatables" uri="http://github.com/dandelion/datatables" %>
Then, let’s update the markup :
<datatables:table id="vets" data="${vets.vetList}" cdn="true" row="vet" theme="bootstrap2" cssClass="table table-striped">
    <datatables:column title="Name">
        <c:out value="${vet.firstName} ${vet.lastName}"></c:out>
    </datatables:column>
    <datatables:column title="Specialties">
        <c:forEach var="specialty" items="${vet.specialties}">
            <c:out value="${specialty.name}"/>
        </c:forEach>
        <c:if test="${vet.nrOfSpecialties == 0}">none</c:if>
    </datatables:column>
</datatables:table>
Let’s comment a bit the datatables:table tag and its attributes:
-
With Dandelion-Datatables, you don’t need to use the native HTML
tabletag any longer. All the HTML markup will be generated by the taglib thanks to thedatatables:tabletag -
The
idanddataattributes are mandatory here.
id is just a HTML pass through attribute
* data is the data source used to populate the table. We use Expression Language here to access the collection previously set in the request.
-
The
rowattribute is quite important here: this attribute tells Dandelion-Datatables to set a variable (page-scoped) that will be available during the iteration through the name it was assigned (“vet” here). This way, you will be able to use this variable and so access all the bean’s properties in the columns. -
We use the
cdnattribute here to tell Dandelion-Datatables to grab the needed static resources from a compatible CDN (the Microsoft’s one today). This way, all JS and CSS needed by DataTables will be automatically loaded in the page -
We also use one of the the cool features of Dandelion-Datatables : theming. Today, Bootstrap 2 and jQuery UI ThemeRoller are supported. Just use the
themeattribute to activate the theme you want. Note that the static resources needed by those themes must be added manually before using the taglib. -
cssClassis, as forid, a HTML pass through attribute
Now let’s comment a bit the datatables:column tag and its attributes :
-
Since no property is directly displayed in a column, we can’t use the
propertyattribute but instead, we set a body to thedatatables:columntag. This will allows us to use anything we need inside (JSTL, Expression Language, plain HTML, …) -
The
titleattribute is used to fill thethcells
At this point, the taglib will generate the needed DataTables configuration (composed of Javascript and potentially CSS) and the table will be rendered using DataTables. Pretty cool right? :-)
##### ownersList.jsp
Let’s adapt the other JSP. This time, we also use the JSTL c:forEach tag to iterate over a collection of owners.
<table class="table table-striped">
    <thead>
        <tr>
            <th style="width: 150px;">Name</th>
            <th style="width: 200px;">Address</th>
            <th>City</th>
            <th>Telephone</th>
            <th style="width: 100px;">Pets</th>
        </tr>
    </thead>
    <c:forEach var="owner" items="${selections}">
        <tr>
            <td>
                <spring:url value="owners/{ownerId}.html" var="ownerUrl">
                    <spring:param name="ownerId" value="${owner.id}"/>
                </spring:url>
                <a href="${fn:escapeXml(ownerUrl)}"><c:out value="${owner.firstName} ${owner.lastName}"/></a>
            </td>
            <td><c:out value="${owner.address}"/></td>
            <td><c:out value="${owner.city}"/></td>
            <td><c:out value="${owner.telephone}"/></td>
            <td>
                <c:forEach var="pet" items="${owner.pets}">
                    <c:out value="${pet.name}"/>
                </c:forEach>
            </td>
        </tr>
    </c:forEach>
</table>
Now, using Dandelion-Datatables:
<datatables:table id="owners" data="${selections}" cdn="true" row="owner" theme="bootstrap2" cssClass="table table-striped">
    <datatables:column title="Name" cssStyle="width: 150px;">
        <spring:url value="owners/{ownerId}.html" var="ownerUrl">
            <spring:param name="ownerId" value="${owner.id}"/>
        </spring:url>
        <a href="${fn:escapeXml(ownerUrl)}"><c:out value="${owner.firstName} ${owner.lastName}"/></a>
    </datatables:column>
    <datatables:column title="Address" property="address" cssStyle="width: 200px;"/>
    <datatables:column title="City" property="city"/>
    <datatables:column title="Telephone" property="telephone"/>
    <datatables:column title="Pets" cssStyle="width: 100px;">
        <c:forEach var="pet" items="${owner.pets}">
            <c:out value="${pet.name}"/>
        </c:forEach>
    </datatables:column>
</datatables:table>
Note here that:
-
You can use anything you want inside a
datatables:columntag: plain HTML, Expression Language, JSTL, Spring taglibs, … -
In the “Address”, “City” and “Telephone” columns, we just display a bean’s property. For this purpose, you can use the
propertyattribute where you just need to pass the name of the property.
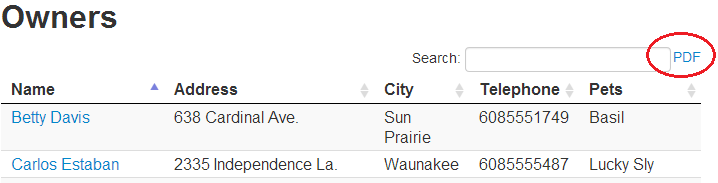
At this point, we have achieved our initial goal. The main tables of the application are now displayed using DataTables.
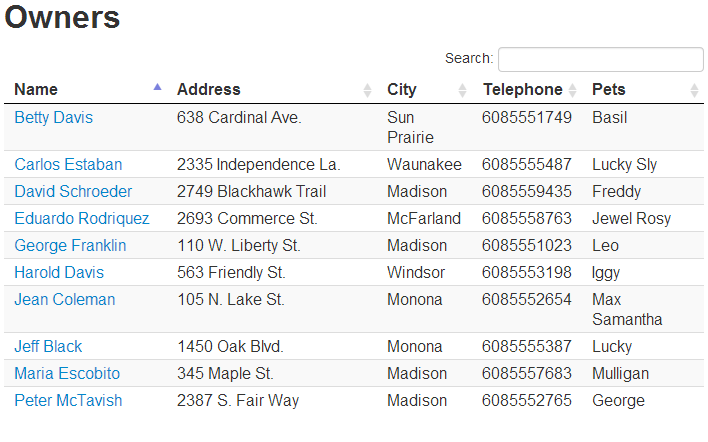
Also note that both tables have additional features:
-
You can sort on any column
-
A search box appeared on the top-right, allowing you to filter data on every column very quickly
#### Bonus step : adding PDF export
In order to show another cool feature of Dandelion-Datatables, we decided to add a PDF export. Well, let’s do this!
Some extras already exist and provide some utilities to deal with export. In this use case, since we want to export in PDF format, we will use the datatables-export-itext that contains :
-
the iText library
-
an export class that Dandelion-Datatables will use by default when exporting data
First, let’s update the pom.xml to add the new dependency :
<dependency>
    <groupId>com.github.dandelion</groupId>
    <artifactId>datatables-export-itext</artifactId>
    <version>0.8.11</version>
</dependency>
Second step, since we’re keeping backward compatibility with the Servlet 2.x API, we need to update the deployment descriptor again (web.xml) by adding the Datatables filter :
<!-- Dandelion-Datatables filter definition (used for export) -->
<filter>
    <filter-name>datatablesFilter</filter-name>
    <filter-class>com.github.dandelion.datatables.extras.servlet2.filter.DatatablesFilter</filter-class>
</filter>
<filter-mapping>
    <filter-name>datatablesFilter</filter-name>
    <url-pattern>/*</url-pattern>
</filter-mapping>
Note that the above filter configuration is automatically done using a Servlet 3.x compatible container, so that you don’t need to add anything in the
web.xml file.
Let’s adapt the markup now.
Enabling export is quite easy. Just set the export table attribute to the type of export you want (pdf here). Remember that Dandelion-Datatables will use the datatables-export-itext extra by default (based on the iText library).
<datatables:table id="owners" data="${selections}" ... export="pdf">
...
</datatables:table>
As a consequence, you will see an export link appearing at the top-right of the table.
Let’s click and see!
Two problems here.
- First, the export link is a bit ugly.
Indeed, Dandelion-Datatables generates unstyled links by default, in order to be as flexible as possible. You can however adapt the link to fit your need using the datatables:export tag.
Just add a datatables:export tag as follows:
<datatables:table id="owners" data="${selections}" ... export="pdf">
    ...
    <datatables:export type="pdf" cssClass="btn btn-small" />
</datatables:table>
The datatables:export tag allows you to configure all exports that are currently enabled in the table.
You need to bind the tag using the type attribute and then add all the configuration you need (css classes to apply, the export file name, header inclusion/exclusion, …).
In our case, we just add the Bootstrap classes as we did before on buttons using the cssClass attribute.
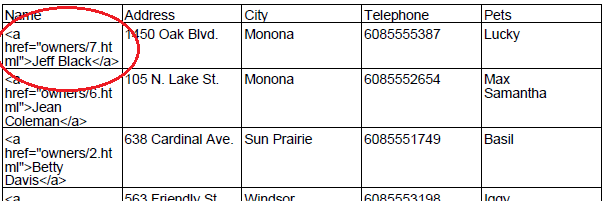
- Second, more important, HTML markup appears in the PDF export.
Fortunately, you can also configure the column’s content in each export. Let’s see how to do this. Actually, you want two different types of display, one for the HTML (containing the HTML markup, links, formatting, …) and another one for the PDF, without any HTML markup.
For this purpose, you can use the display attribute of the datatables:column tag as follows :
<datatables:table id="owners" data="${selections}" ... export="pdf">
    <datatables:column title="Name" display="html" cssStyle="width: 150px;">
        <spring:url value="owners/{ownerId}.html" var="ownerUrl">
            <spring:param name="ownerId" value="${owner.id}"/>
        </spring:url>
        <a href="${fn:escapeXml(ownerUrl)}"><c:out value="${owner.firstName} ${owner.lastName}"/></a>
    </datatables:column>
    <datatables:column title="Name" display="pdf">
        <c:out value="${owner.firstName} ${owner.lastName}"/>
    </datatables:column>
    ...
    <datatables:export type="pdf" cssClass="btn btn-small" />
</datatables:table>
You’ve noticed that two columns have been added here, with the same title, but not with the same value in the display attribute.
It just means that :
-
the first one (with “html” as a value) will only be rendered in the HTML source, nowhere else.
-
the second one (with “pdf” as a value) will only be rendered in the PDF export, nowhere else.
As a result, let’s look at both the HTML page and the PDF export:
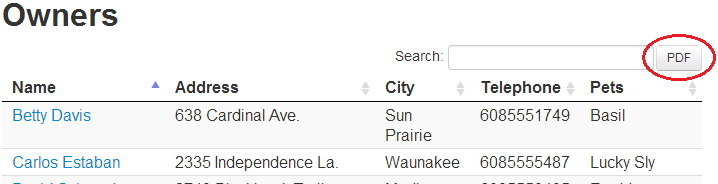

Both issues are now fixed. :-)
#### Conclusion
We’ve seen in this tutorial how to integrate Dandelion-Datatables in a classic web app whose view layer is based on JSP.
Note that Dandelion-Datatables has lots of other features : Thymeleaf support, DataTables plugins support, AJAX sources, server-side processing, …
If you have any question, feel free to contact us using the forum, filling out a new issue or using the comments below.
#### References
Dandelion-Datatables site