1. Introducing Dandelion-Core
1.1. What is Dandelion-Core?
Dandelion-Core is the foundation of the Dandelion framework. It includes the whole mechanics to handle static and dynamic web assets such as JavaScript or CSS.
1.2. Features overview
Major topics covered by Dandelion-Core are:
-
asset organization in bundles, with several possible asset locations such as
webapp,webjar,remote, … -
asset processing, such as minification
-
asset caching, both server and client side
-
asset versioning, manual or automatic via different strategies
-
asset generation, allowing to extend the core with components
All these topics will be addressed in this document.
1.3. Overall functioning
Dandelion-Core is mainly based on a Filter which dynamically injects assets into HttpServletResponses, that is - HTML pages. Dandelion-Core is therefore considered as a runtime solution (as opposed to build time solutions provided by other frameworks/libraries).
Dandelion-Core reads a set of bundle definitions, either embedded within existing components, directly provided by end-users or both, and represented in the JSON format. Once these bundle definitions consumed, Dandelion-Core builds a directed acyclic graph of bundles (or bundles graph later in this document) and binds it to every requests made against the web application.
As soon as the end-user requests a bundle, using any of the provided ways (JSP taglib, Thymeleaf dialect, …), Dandelion-Core traverses the bundle graph to extract all corresponding assets and then injects <script> ans <link> tags into the HTML page.
Since Dandelion-Core have full control over these assets, many actions can be performed such as asset versioning, browser caching, and many more.
2. Requirements
-
Java Runtime Environment 6+
-
Servlet 3.0+ container such as Jetty 8.x, Tomcat 7.x, JBoss AS 6, Weblogic Server 12c…
3. Installation
3.1. Common installation steps
The list below covers the common steps across all supported template engines.
-
Step 1: Add the server-side dependency
Depending on the template engine you wish to use in your web application, add either dandelion-jsp or dandelion-thymeleaf to your project’s dependencies.
<dependency>
  <groupId>com.github.dandelion</groupId>
  <artifactId>dandelion-jsp</artifactId>
  <version>1.1.1</version>
</dependency><dependency>
<groupId>com.github.dandelion</groupId>
<artifactId>dandelion-thymeleaf</artifactId>
<version>1.1.1</version>
</dependency>| When using a build tool such as Maven, the above dependencies are not explicitely needed when you directly use a component such as Dandelion-Datatables, thanks to the transitive dependencies |
-
Step 2: Configure the Dandelion filter
Add the following configuration to your web.xml file:
<!-- Dandelion filter definition and mapping -->
<filter>
  <filter-name>dandelionFilter</filter-name>
  <filter-class>com.github.dandelion.core.web.DandelionFilter</filter-class>
</filter>
<filter-mapping>
  <filter-name>dandelionFilter</filter-name>
  <url-pattern>/*</url-pattern>
  <dispatcher>REQUEST</dispatcher> (1)
  <dispatcher>FORWARD</dispatcher>
  <dispatcher>INCLUDE</dispatcher>
  <dispatcher>ERROR</dispatcher>
</filter-mapping>| 1 | Note that all dispatcher types should be specified in order for the filter to work in any situation. |
Add the following configuration to your web.xml file:
<!-- Dandelion servlet definition and mapping -->
<servlet>
  <servlet-name>dandelionServlet</servlet-name>
  <servlet-class>com.github.dandelion.core.web.DandelionServlet</servlet-class>
</servlet>
<servlet-mapping>
  <servlet-name>dandelionServlet</servlet-name>
  <url-pattern>/dandelion-assets/*</url-pattern> (1)
</servlet-mapping>| 1 | Note that the URL pattern can be customized thanks to the asset.url.pattern config option |
3.2. JSP-specific step
-
Declare the taglib definition
Anywhere you wish to use the taglib, declare it in the JSP:
<%@ taglib prefix="dandelion" uri="http://github.com/dandelion" %>
3.3. Thymeleaf-specific steps
-
Declare the Thymeleaf dialect
If you’re using Spring/Spring MVC, update the SpringTemplateEngine bean as follows:
<bean id="templateEngine" class="org.thymeleaf.spring3.SpringTemplateEngine">
  <property name="templateResolver" ref="templateResolver" />
  <property name="additionalDialects">
    <set>
      <bean class="com.github.dandelion.thymeleaf.dialect.DandelionDialect" />
    </set>
  </property>
</bean>
Otherwise, add the DandelionDialect to your existing Thymeleaf template engine like this:
...
TemplateEngine templateEngine = new TemplateEngine();
templateEngine.addDialect(new DandelionDialect());
...-
Declare the Thymeleaf namespace
<html xmlns:th="http://www.thymeleaf.org" xmlns:dt="http://github.com/dandelion">This way you can benefit from some content assist in your favorite IDE:
-
Eclipse: see the Thymeleaf Eclipse plugin
-
IntelliJ IDEA: see this topic
| Using a wrong namespace will prevent the content assist from working correctly |
3.4. Spring-specific steps
In case you’re using Spring and the Spring’s dispatcher is configured with a / mapping, you will need to configure the Spring’s default servlet handler in order to have static content properly served.
Using JavaConfig:
public void configureDefaultServletHandling(DefaultServletHandlerConfigurer configurer) {
  configurer.enable();
}
Or XML:
<mvc:default-servlet-handler/>4. Assets and asset bundles
4.1. Introducing assets and asset bundles
In web applications, assets are basically all the JavaScript and CSS files loaded in your HTML pages. Dandelion-Core provides a wider representation of these assets, using bundles.
An assets bundle, or bundle to simplify the language, is a logical group of assets.
4.1.1. Definitions
More formally, a bundle is defined as follows:
| Attribute | Description | Required |
|---|---|---|
Name of the bundle |
No. Can be inffered from the file name. |
|
Set of bundles that need to be loaded before |
No |
|
Set of assets that compose the bundle |
Yes |
And an asset is defined as follows:
| Attribute | Description | Required |
|---|---|---|
Name of the asset |
No. Can be inferred from the first found location. |
|
Version of the asset |
No |
|
Type of the asset, among |
No. Can be inferred from the extension specified in the first found location |
|
Map of location key / location pairs that provides information about how to fetch the asset |
Yes |
|
Desired position in the DOM, among |
No. By default |
Example
Assuming the following assets store in your webapp directory:
project-root
|__ src
   |__ main
      |__ webapp
         |__ assets
            |__ js
               |__ vendor
                  |__ jquery.js (1)
               |__ app.js (2)
|__ ...| 1 | Asset that contains the jQuery vendor library |
| 2 | Client code that uses jQuery |
One representation could be the following:
{
  "assets":[
    {
      "locations":{
        "webapp":"/assets/js/vendor/jquery.js"
      }
    }
  ]
}{
"bundle" : "app", (1)
"dependencies" : ["jquery"], (2)
"assets":[
{
"locations":{
"webapp":"/assets/js/app.js"
}
}
]
}| 1 | The name of the bundle is explicitely declared here |
| 2 | jquery is the name of the first bundle above, inferred from the bundle file name jquery.json |
As soon as the app bundle is requested, all assets contained in the jquery bundle will be loaded before app.js since the jquery bundle is marked as dependent.
4.1.2. JSON representation
All assets intented to be used in your web applications need to be known by Dandelion. As a consequence, you have to create bundles accordingly, in a declarative approach.
Each bundle is basically a JSON file, located under the classpath_root/dandelion folder.
project-root
|__ src
   |__ main
      |__ resources
         |__ dandelion
            |__ bundle1.json
            |__ bundle2.json
            |__ ...
Example
Assume you want to use jQuery in your web application. One representation could be the following:
{
  "bundle":"jquery",
  "assets":[
    {
      "version":"1.11.0",
      "locations":{
        "remote":"//cdnjs.cloudflare.com/ajax/libs/jquery/1.11.0/jquery.js" (1)
      }
    }
  ]
}| 1 | the jquery asset is configured with the remote location key. This key is mapped to a particular asset locator used by Dandelion-Core to know the fetching strategy to use. Read more about asset locators. |
4.1.3. Bundle loading
Dandelion will load all bundle definitions in a particular order, using bundle loaders. See the bundle loaders section for more information.
4.2. Building a bundle graph
As bundles are scanned, Dandelion stores them internally as a directed acyclic graph or DAG, which is used to implement the relationship of dependency between bundles.
This DAG will be considered as bundle graph in the rest of the documentation.
4.2.1. Bundle dependencies
The bundle graph is built implicitely, depending on the bundle definitions and specifically their dependencies.
Example
Assume the following bundles: jquery, datatables and bootstrap2.
{
  "assets": [
    {
      "version": "1.11.0",
      "locations": {
        "remote": "//cdnjs.cloudflare.com/ajax/libs/jquery/1.11.0/jquery.js"
      }
    }
  ]
}{
"dependencies": [ "jquery" ],
"assets": [
{
"version": "1.9.4",
"locations": {
"remote": "//ajax.aspnetcdn.com/ajax/jquery.dataTables/1.9.4/jquery.dataTables.js"
}
},
{
"version": "1.9.4",
"locations": {
"remote": "//ajax.aspnetcdn.com/ajax/jquery.dataTables/1.9.4/css/jquery.dataTables.css"
}
}
]
}{
"dependencies" : [ "jquery" ],
"assets": [
{
"version": "2.3.2",
"locations": {
"remote": "//netdna.bootstrapcdn.com/twitter-bootstrap/2.3.2/js/bootstrap.js"
}
},
{
"version": "2.3.2",
"locations": {
"remote": "//netdna.bootstrapcdn.com/twitter-bootstrap/2.3.2/css/bootstrap.css"
}
}
]
}A graphical representation would look like:

As soon as the bootstap2 bundle is requested, Dandelion will read the bundle graph and then return in the right order the following assets:
-
jquery.js
-
bootstrap.js
-
bootstrap.css
And due to the default DOM position (see the asset definition), Dandelion will inject the requested assets into the HTML page as follows:
<html>
  <head>
    ...
    <link href="//netdna.bootstrapcdn.com/twitter-bootstrap/2.3.2/css/bootstrap.css"></link>
  </head>
  <body>
    ...
    <script src="//cdnjs.cloudflare.com/ajax/libs/jquery/1.11.1/jquery.js"></script>
    <script src="//netdna.bootstrapcdn.com/twitter-bootstrap/2.3.2/js/bootstrap.js"></script>
  </body>
</html>
4.2.2. Storage rules
Dandelion applies some storage rules in order to keep consistency between bundles. All of theses rules are checked at startup, more precisely in the init(FilterConfig) method of the DandelionFilter and are described below.
#1 The same asset can’t be added twice in the same bundle definition
{
  "bundle":"my-bundle",
  "assets":[
    {
      "name":"my-asset1",
      "type":"js",
      ...
    },
    {
      "name":"my-asset1",
      "type":"js",
      ...
    }
  ]
}{
"bundle":"my-bundle",
"assets":[
{
"name":"my-asset1",
"type":"js",
...
},
{
"name":"my-asset2",
"type":"js",
...
}
]
}| The uniqueness of the assets is based both on the asset type and on its name. As a consequence, the following configuration is permitted: |
{
  "bundle":"my-bundle",
  "assets":[
    {
      "name":"my-asset1",
      "type":"js",
      ...
    },
    {
      "name":"my-asset1",
      "type":"css",
      ...
    }
  ]
}
#2 The same location key can’t be used twice in the same asset definition
{
  "bundle":"my-bundle",
  "assets":[
    {
      "name":"my-asset",
      ...,
      "locations":{
        "remote":"//cdn1",
        "remote":"//cdn2",

      }
    }
}{
"bundle":"my-bundle",
"assets":[
{
"name":"my-asset",
...,
"locations":{
"remote":"//cdn",
"webapp":"/assets/...",
}
}
}#3 Cycles between bundles must be avoided
{
  "bundle":"bundle1",
  "dependencies": ["bundle2"],
}{
"bundle":"bundle2",
"dependencies": ["bundle3"],
}{
"bundle":"bundle3",
"dependencies": ["bundle1"],
}| An exception is thrown as soon as a cycle is detected among your bundles. |
4.2.3. Organizing your bundles
You are totally free to build a bundle the way you want it, e.g. by adding as many assets as you want. However, you should take the following considerations into account:
-
Reduce as much as possible the number of bundles
-
First for performance concerns, even if the bundle loading phase is very fast.
-
But mostly for maintenance concerns. The more bundles you have, the harder the maintenance will be over the time.
-
-
Pay attention to the granularity of bundles: using only one bundle for all assets of your site would lead to bad consequences:
-
it would affect performances, especially if assets are injected into pages whereas they aren’t needed
-
it would become harder and harder to share bundles among multiple pages, causing to create a new bundle each time you create a new page, finally leading to the consequences explained in the first point
-
4.3. Interacting with the bundle graph
It is important to note that once built, the bundle graph is accessed by almost all HTTP requests made against the server. More precisely, it is accessed as soon as:
-
the HTTP request is intercepted by the
DandelionFilter -
and one (or more) bundle is included in the HTTP request
There are many ways to include a bundle in a request, each of them are described below.
4.3.1. Using the JSP taglib
4.3.1.1. Including/excluding bundles
The <dandelion:bundle> tag is designed for this purpose.
You can include one or more bundles into the HTTP request by using the includes attribute of the <dandelion:bundle> tag.
Example
<%@ taglib prefix="dandelion" uri="http://github.com/dandelion" %>

<dandelion:bundle includes="bundle-to-include" />
In the same way, use the excludes attribute to excludes bundle from the current request.
4.3.1.2. Including/excluding assets
You can also interact with the graph at a more fine-grained level, by directly removing assets from the HTTP request. The <dandelion:asset> tag is designed for this purpose.
Example
Assuming the following bundle:
{
  "assets": [
    {
      "name" : "asset1",
      "type" : "js"
    },
    {
      "name" : "asset2",
      "type" : "js"
    }
  ]
}
You can exclude the asset2 asset from the request with:
<%@ taglib prefix="dandelion" uri="http://github.com/dandelion" %>

<dandelion:asset jsExcludes="asset2" />
As a consequence, only the asset called asset1 will appear in the HTML source code.
4.3.2. Using the Thymeleaf dialect
| Make sure you to follow both common and Thymeleaf-based installation steps |
4.3.2.1. Including/excluding bundles
The ddl:bundle* attributes are designed for this purpose.
You can include one or more bundles into the HTTP request by using the ddl:bundle-includes attribute on any HTML tag.
Example
<html xmlns:th="http://www.thymeleaf.org"
      xmlns:ddl="http://www.thymeleaf.org/dandelion"
      ddl:bundle-includes="bundle-to-include">
...
</html>
In the same way, use the ddl:bundle-excludes attribute to excludes bundle from the current request.
4.3.2.2. Including/excluding assets
You can also interact with the graph at a more fine-grained level, by directly removing assets from the HTTP request. The ddl:asset* attributes are designed for this purpose.
Example
Assuming the following bundle:
{
  "assets": [
    {
      "name" : "asset1",
      "type" : "js"
    },
    {
      "name" : "asset2",
      "type" : "js"
    }
  ]
}
You can exclude the asset2 asset from the request with:
<html xmlns:th="http://www.thymeleaf.org"
      xmlns:ddl="http://www.thymeleaf.org/dandelion"
      ddl:asset-js-excludes="asset2">
...
</html>
As a consequence, only the asset called asset1 will appear in the HTML source code.
4.3.3. Using the API
The bundle graph can also be accessed using the Dandelion API. This is how components, such as Dandelion-Datatables, interact with it.
The only requirement is that you have access to the HttpServletRequest API.
You can then use the AssetRequestContext object, an utility made available for accessing the bundle graph.
AssetRequestContext.get(request) (1)
  .addBundles(...) // add one or more bundles to the given request
  .excludeBundles(...) // exclude one or more bundles from the given request
  .excludeJs(...) // exclude one or more JavaScript assets from the given request
.excludeCss(...) // exclude one or more CSS assets from the given request| 1 | To each HttpServletRequest is associated an AssetRequestContext which is used when the bundle graph is requested |
4.3.4. Using the configuration options
Some configuration options allow you to interact either with bundles or assets but in a wider scope than the HTTP request.
4.3.4.1. Include/exclude bundles in all requests
Sometimes it might be useful to load some assets in all web pages of the application, e.g. some CSS directives. Some configuration options has been designed for this purpose.
In order to include one bundle permanently, use the bundle.includes option.
Example
bundle.includes = bundle-to-includeAs a consequence, the bundle-to-include bundle will be included in every HTTP request.
And for some reason, if you need to do the opposite, you can exclude bundles from the application by using the bundle.excludes option.
4.3.4.2. Include/exclude assets permanently
Similarly you can permanently exclude assets from the application. Two configuration options are available: asset.js.excludes and asset.css.excludes.
5. Asset locators
Assets can be fetched from different location thanks to asset locators. This section describes how it works and the available asset locators.
5.1. Introducing asset locators
An asset locator (or locator to simplify the language) is defined as follows:
-
A location key, used as an identifier in the bundle definitions
-
An associated location that may be processed, depending on the locator
5.2 Asset caching
Depending on the locator, Dandelion generates the right URL to serve the asset directly from the location where it lives.
For example, all assets present in the webapp directory are defaultly served by the webapp itself. In this case, Dandelion will just process the given location by prepending the context path and no caching is necessary.
However, an asset stored in the classpath for example, cannot be served directly by the webapp. Instead, in such a case, Dandelion fetches its contents and stores it in the configured cache system, with a particular cache key. Later, the generated link pointing to this asset will be served by the DandelionServlet, the role of which is to retrieve its contents from the cache system and serve it.
See the asset caching section for more information.
5.3. Locations resolution strategy
The most obvious case is to configure an asset with a single location.
{
  "assets": [
    {
      "locations": {
        "remote": "//cdnjs.cloudflare.com/ajax/libs/jquery/1.11.0/jquery.js",
      }
    }
  ]
}
In the above bundle, Dandelion will always use the single remote location to fetch the asset.
In cases where multiple locations are configured for a single asset, Dandelion uses a particular strategy to resolve them. It simply reads the asset.locations.resolution.strategy option from your configuration file and checks if a location is present for a specified set of locators.
The default resolution strategy is defined as follows:
asset.locations.resolution.strategy = webapp, webjar, classpath, jar, file, remote
Here is what happens:
-
First checks if a
webapplocation key is specified. If so, the corresponding location will be selected and processed. -
If not, if a
webjarlocation key is defined, the corresponding location will be selected and processed -
If not, the same for the
classpathlocation key -
If not, the same for the
jarlocation key -
If not, the same for the
filelocation key -
If not, the same for the
remotelocation key -
If none of the above is specified, an exception will be thrown.
Assuming the following bundle:
{
  "assets": [
    {
      "locations": {
        "webapp" : "/assets/js/app.js",
        "remote": "http://cdn.company.com/js/app.js",
      }
    }
  ]
}
In such a case, thanks to the default resolution strategy, Dandelion will first prioritize the webapp location.
| Combined with profiles, this feature is powerful enough to handle multiple locations in multiple environments. |
5.4. Built-in locators
Dandelion comes with a couple of built-in locators. They are all listed below.
5.4.1. webapp locator
The webapp locator should be used whenever you need to load an asset stored in the web application directory.
Location key |
|
Corresponding value |
Relative path to the web application root directory |
Example
Assuming the following project structure:
your-project
|__ src
   |__ main
      |__ webapp
         |__ assets
            |__ js
               |__ app.js
The asset declaration should look like:
{
  "assets": [
    {
      "locations": {
        "webapp": "/assets/js/app.js"
      }
    }
  ]
}
By default, Dandelion will generate the following client-side HTML markup:
<script src="/[contextPath]/dandelion-assets/[storageKey]/js/app-[versionKey].js"></script>5.2.2. classpath locator
The classpath locator should be used whenever you need to load an asset stored in the classpath.
Location key |
|
Corresponding value |
Absolute name of the asset (no leading slash, as it internally uses |
Example
Assuming the following project structure:
your-project
|__ src
   |__ main
      |__ resources
         |__ js
            |__ app.js
The asset declaration should look like:
{
  "assets": [
    {
      "locations": {
        "classpath": "js/app.js"
      }
    }
  ]
}
By default, Dandelion will generate the following client-side HTML markup:
<script src="/[contextPath]/dandelion-assets/[storageKey]/js/app-[versionKey].js"></script>5.2.3. remote locator
The remote locator should be used whenever you need to load an asset hosted externally, e.g. on a Content Delivery Network or any other media server.
Location key |
|
Corresponding value |
URL of the asset (protocal-relative URLs such as //domain/foo.js are supported) |
Example
Assuming the following asset declaration:
{
  "assets": [
    {
      "locations": {
        "remote": "//cdnjs.cloudflare.com/ajax/libs/jquery/1.11.0/jquery.js"
      }
    }
  ]
}
By default, Dandelion will generate the following client-side HTML markup:
<script src="//cdnjs.cloudflare.com/ajax/libs/jquery/1.11.0/jquery.js"></script>5.2.4. jar locator
The jar locator should be used whenever you need to load an asset stored inside a JAR, under the META-INF/resources folder.
Location key |
|
Corresponding value |
Relative path to the |
Example
Consider a JAR in which some assets live in the META-INF/resources folder.
project-root
|__ src
   |__ main
      |__ resources
         |__ META-INF
            |__ resources
               |__ js
                  |__ app.js
According to the above structure, the corresponding bundle should look like:
{
  ...
  "assets": [
    {
      "locations": {
         "jar": "js/app.js"
      }
    }
  ]
}
By default, Dandelion will generate the following client-side HTML markup:
<script src="/[contextPath]/dandelion-assets/[storageKey]/js/app-[versionKey].js"></script>5.2.5. webjar locator
This locator is bundled in the dandelion-webjars extra since it brings a new dependency to the webjars-locator project. This project is internally used by the webjar locator to locate assets inside WebJars.
<dependency>
  <groupId>com.github.dandelion</groupId>
  <artifactId>dandelion-webjars</artifactId>
  <version>1.1.1</version>
</dependency>
The webjar locator should be used whenever you need to load an asset stored inside a WebJar.
Location key |
|
Corresponding value |
Name of the asset (path excluded but extension included) |
Example
Assuming that the bootstrap-2.3.0.jar is present in the classpath, the bundle definition should look like:
{
  "assets": [
    {
      "locations": {
        "webjars": "bootstrap.css"
      }
    }
  ]
}
By default, Dandelion will generate the following client-side HTML markup:
<link rel="stylesheet" href="/[contextPath]/webjars/bootstrap/2.3.0/css/bootstrap.css" />5.2.6. api locator
The api locator should be used for generated assets, i.e. assets whose contents is programmaticaly generated.
Location key |
|
Corresponding value |
Uid of the bound |
This locator, instead of fetching an external asset, will simply call the getAssetContent(HttpServletRequest request) method of AssetContentGenerator.
In order to bind an actual asset generator to the uid, just use the AssetRequestContext utility as follows:
AssetRequestContext
   .get(request) (1)
.addGenerator("uid", <instance of AssetContentGenerator>); (2)| 1 | request is an instance of HttpServletRequest |
| 2 | uid should be the same as the one defined in the bundle |
Note that Dandelion-Core already provides some built-in generator:
-
RawJsContentGeneratorintended to generate raw JavaScript code -
JQueryJsContentGeneratorintended to generate JQuery-flavoured JavaScript
See the asset generators section for more information.
Example
Let’s consider the following bundle, containing a single asset which is configured with the api location key.
{
  "assets": [
    {
      "name" : "generated", (1)
      "type" : "js", (1)
      "locations": {
        "api": "my-generator" (2)
      }
    }
  ]
}| 1 | Note that both name and type need to be explicitely declared when using the ApiLocator |
| 2 | the uid is my-generator here |
In order to bind an asset generator to the uid, let’s use the AssetRequestContext utility, which is the main entry point for manipulating the Dandelion context:
AssetRequestContext
  .get(request) (1)
.addGenerator("my-generator", new CustomRawGenerator()); (2)| 1 | get(request) actually gets the AssetRequestContext from the HttpServletRequest or creates it if it doesn’t exist |
| 2 | addGenerator("my-generator", new CustomRawGenerator()) will fill the AssetRequestContext with a new generator and register it with the my-generator uid |
The CustomRawGenerator is here a simple implementation of AbstractJsContentGenerator (which produces dumb code):
public class CustomRawGenerator extends AbstractJsContentGenerator {

   @Override
   protected String getJavascriptContent(HttpServletRequest request) {
      return "alert('I have been generated!')";
   }
}
And that’s all!
Finally, by default, Dandelion will generate the following client-side HTML markup:
<script src="/[contextPath]/dandelion-assets/[storageKey]/generated-[versionKey].js"></script>| This locator is the best entry point to write Dandelion components (such as Dandelion-Datatables) |
5.2.7. file locator
The file locator should be used whenever you need to load an asset stored in the local file system.
Location key |
|
Corresponding value |
Absolute path of the asset |
Example
Assuming the asset is stored in the /usr/local/app/assets/app.js, the asset declaration should look like:
{
  "assets": [
    {
      "locations": {
        "file": "/usr/local/app/assets/app.js"
      }
    }
  ]
}
By default, Dandelion will generate the following client-side HTML markup:
<script src="/[contextPath]/dandelion-assets/[storageKey]/js/app-[versionKey].js"></script>5.3. Plugging-in your own asset locator
Like most parts of the framework, you can use your own asset locator thanks to the SPI mechanism.
In order to plug-in your own locator, just follow these steps:
-
Create a class that extends
AbstractAssetLocatorpackage com.foo.asset.locator.impl; public class MyLocator extends AbstractAssetLocator { @Override public String getLocationKey() { return "a-new-location-key"; } @Override public boolean isCachingForced() { return false; } @Override public String doGetLocation(AssetStorageUnit asu, HttpServletRequest request) { return "the location of the asset"; } @Override protected String doGetContent(String location, Map<String, Object> parameters, HttpServletRequest request) { return "the contents of the asset"; } } -
In the
META-INF/servicesfolder, create a text file (UTF-8 encoded) using the following convention:Example with a Maven projectproject-root |__ src |__ main |__ resources |__ META-INF |__ services |__ com.github.dandelion.core.asset.locator.AssetLocatorInside this file, just add the fully qualified name of your own implementation. For example:
com.foo.asset.locator.impl.MyLocator
And that’s all! Dandelion, thanks to the SPI mechanism, will automatically pick up your implementation on the next restart.
6. Asset versioning
Versioning of assets is not only an important aspect of optimizing for performance, but can also be critical for correct functioning of your application.
In order to facilitate the versioning, Dandelion-Core provides two modes: manual and automatic.
6.1. Versioning modes
6.1.1. Automatic
The automatic versioning mode is based on different strategies: either based on the contents of each asset or on a fixed version. Each of these strategies are detailed below.
Note that this is the default mode for all non-vendor assets.
6.1.2. Manual
The manual versioning mode relies on bundle definitions, in which assets can have a version attribute. In such a case, the asset version is just read from the asset’s attributes and is applied during the generation of <script> and <link> tags.
| The versioning of vendor assets (assets located in vendor bundles) is always manual, i.e. read from the bundle definitions. |
6.2. Versioning strategies
6.2.1. Content-based
This strategy consists of generating a fingerprint for each asset, based on its contents. This technique is also known as fingerprinting or cache busting. The fingerprint, which simply is a MD5 hash, is inserted into the asset name.
<link rel="stylesheet" href="/assets/css/app-[MD5HASH].css"></link>When the asset is static or infrequently changed, this provides an easy way to tell whether two versions of an asset are identical, even across different servers or deployment dates.
When the asset content change, the fingerprint is updated. This will cause the remote clients to request a fresh copy of the asset. In combination with the right caching headers, this is the most powerful technique for better web performance. See the asset caching section for more information.
This strategy is selected by default, but if you wish, you can explicitely specify it using the asset.versioning.strategy configuration option:
asset.versioning.strategy=content
6.2.2. Fixed
This strategy consists of using a fixed version for any asset, for example a date, a global version number from a property file, a Jenkins build number or anything else.
In order to use this versioning strategy, use the asset.versioning.strategy configuration option as follows:
asset.versioning.strategy=fixed
Once set, Dandelion-Core provides some ready-to-use versioning types:
Versioning type |
Activation |
Value |
String |
(default) |
(default) |
Date |
|
(default) |
Example
Used in combination with Maven filtering, you could filter the dandelion.properties configuration file and use a global version among all your assets.
...
<artifactId>your-artifactId</artifactId>
<groupId>your-groupId</groupId>
<version>1.10.0</version>
...
<build>
  <resources>
    <resource>
      <directory>src/main/resources</directory>
      <filtering>true</filtering>
    </resource>
  </resources>
</build>
...asset.fixed.version.value = ${project.version}This way, all assets will contain the same version in their name:
<link rel="stylesheet" href="/assets/js/app-1.10.0.js"></link>6.3. Plugging-in your own asset versioning strategy
In order to plug-in your own versioning strategy, just follow these steps:
-
Create a class that extends
AbstractAssetVersioningStrategypackage com.foo.asset.versioning.impl; public class MyVersioningStrategy extends AbstractAssetVersioningStrategy { @Override public String getName() { return "strategy-identifier"; } @Override public String getAssetVersion(Asset asset) { return "The version you wish"; } } -
In the
META-INF/servicesfolder, create a text file (UTF-8 encoded) using the following convention:Example with a Maven projectproject-root |__ src |__ main |__ resources |__ META-INF |__ services |__ com.github.dandelion.core.asset.versioning.AssetVersioningStrategyInside this file, just add the fully qualified name of your own implementation. For example:
com.foo.asset.versioning.impl.MyVersioningStrategy
-
Once the strategy created, you just need to activate it using the
asset.versioning.strategyconfiguration option and the strategy identifier configured in the above class:asset.versioning.strategy = strategy-identifier
7. Asset processors
7.1. Introducing asset processors
Dandelion provides some processors intended to be applied on assets. This section introduces major concepts around these processors.
7.1.1. Definition
An asset processor (or processor to simplify the language) is defined as follows:
-
A processor key, used as an identifier
-
A type of asset to process, such as js or css
Most of the existing processors are used to minify assets.
Dandelion-Core already provides some built-in processors which are auto-configured depending on the active profile. See below for more information.
| In upcoming releases, more processors will be provided, allowing to process more CSS and JavaScript languages such as CoffeeScript or Sass. |
7.1.2. Configuring asset processors
Asset processors are configured via the asset.processors configuration option. You just need to define a comma-separated list of processor keys to enable the corresponding processors on all assets.
For example, the default value is in the prod profile is cssurlrewriting,jsmin,cssmin. This means that by default, the corresponding processors will be applied sequentially on all assets, depending on their type.
7.1.3. Enabling asset processing
The asset processing is enabled thanks to the asset.minification configuration option.
Set it to true to minify all assets using the configured processors. Set it to false and all assets will be served as-is.
7.1.4. Asset caching and naming strategy
It is worth noting that:
-
Asset naming: the min keyword is automatically appended to the asset name, just before its extension.
For example, an original asset called
app.csswill be served asapp-[MD5HASH].min.css. -
Asset caching: once processed, all assets will be cached in the configured cache system, and then served by the
DandelionServlet.
7.2. Built-in processors
Dandelion comes with some built-in processors. They can be summarised in the following table:
Processor key |
Compatible asset type |
cssmin |
CSS |
cssurlrewriting |
CSS |
jsmin |
JS |
7.2.1. CSSMin
This processor uses a fork of the Yahoo’s YUI Compressor authored by Andrew Roberts.
7.2.3. CSS URL rewriting
This processor processes all relative paths in CSS and replaces them by absolute ones according to the number of occurrences of ".." counted.
Example
Before:
The CSS file is loaded from:
http://cdnjs.cloudflare.com/ajax/libs/datatables/1.9.4/css/jquery.dataTables.css
and contains:
.paginate_enabled_previous {
  background: url('../images/back_enabled.png');
}
After, the line will be replaced by:
.paginate_enabled_previous {
  background: url('http://cdnjs.cloudflare.com/ajax/libs/datatables/1.9.4/images/back_enabled.png');
}
7.2.4. JsMin
This processor is based on a translation frop C to Java of jsmin.c published by Douglas Crockford.
Example
Before:
// is.js

// (c) 2001 Douglas Crockford
// 2001 June 3


// is

// The -is- object is used to identify the browser.  Every browser edition
// identifies itself, but there is no standard way of doing it, and some of
// the identification is deceptive. This is because the authors of web
// browsers are liars. For example, Microsoft's IE browsers claim to be
// Mozilla 4. Netscape 6 claims to be version 5.

var is = {
    ie:      navigator.appName == 'Microsoft Internet Explorer',
    java:    navigator.javaEnabled(),
    ns:      navigator.appName == 'Netscape',
    ua:      navigator.userAgent.toLowerCase(),
    version: parseFloat(navigator.appVersion.substr(21)) ||
             parseFloat(navigator.appVersion),
    win:     navigator.platform == 'Win32'
}
is.mac = is.ua.indexOf('mac') >= 0;
if (is.ua.indexOf('opera') >= 0) {
    is.ie = is.ns = false;
    is.opera = true;
}
if (is.ua.indexOf('gecko') >= 0) {
    is.ie = is.ns = false;
    is.gecko = true;
}
After:
var is={ie:navigator.appName=='Microsoft Internet Explorer',java:navigator.javaEnabled(),ns:navigator.appName=='Netscape',ua:navigator.userAgent.toLowerCase(),version:parseFloat(navigator.appVersion.substr(21))||parseFloat(navigator.appVersion),win:navigator.platform=='Win32'}
is.mac=is.ua.indexOf('mac')>=0;if(is.ua.indexOf('opera')>=0){is.ie=is.ns=false;is.opera=true;}
if(is.ua.indexOf('gecko')>=0){is.ie=is.ns=false;is.gecko=true;}
7.3. Plugging-in your own processor
In order to plug-in your own asset processor, just follow these steps:
-
Create a class that extends
AbstractAssetProcessorand annotate it with@CompatibleAssetTypepackage com.foo.asset.processor.impl; @CompatibleAssetType(types = AssetType.css) (1) public class MyProcessor extends AbstractAssetProcessor { @Override public String getProcessorKey() { return "myprocessorkey"; } @Override public void doProcess(Asset asset, Reader reader, Writer writer) throws Exception { ... } }1 Specify the asset type for which the processor is compatible -
In the
META-INF/servicesfolder, create a text file (UTF-8 encoded) using the following convention:Example with a Maven projectproject-root |__ src |__ main |__ resources |__ META-INF |__ services |__ com.github.dandelion.core.asset.processor.AssetProcessorInside this file, just add the fully qualified name of your own implementation. For example:
com.foo.asset.processor.impl.MyProcessor
-
Finally, update the
asset.processorsconfiguration option by including your processor. For example:asset.processors=cssurlrewriting,jsmin,cssmin,myprocessorkey
8. Bundle loaders
Bundles fall into two categories: vendor and regular. All vendor bundles are supposed to reference vendor assets or libraries such as jQuery. Regular bundles are supposed to reference all other assets, in particular all assets developed and maintained by yourself for your application.
This disctinction is important because Dandelion doesn’t behave in the same way with vendor and regular bundles, especially in terms of versioning, processing and loading.
8.1. Introducing bundle loaders
The main goals of bundle loaders are:
-
to scan for bundle definitions (all
*.jsonfiles) in the classpath, *vendor* and regular ones -
to map each of the loaded files into a comprehensive format and feed the bundle graph
Since v1.1.0, new pre-loaders have been introduced, particularly to provide integration with package managers such as Bower.
8.2. Loading order
All loaders and pre-loaders are invoked in particular order which is described below:
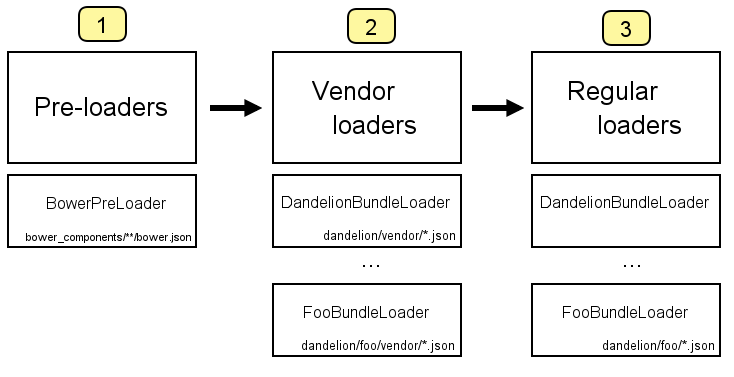
-
All pre-loaders are invoked first. Pre-loaders will scan for all components downloaded using package managers and convert all these components as vendor bundles. Note that all pre-loaders can be disabled thanks to the
bundle.pre.loadersoption. -
Then, all bundle loaders are invoked to scan for vendor bundles, with the built-in
DandelionBundleLoaderalways acting in last -
Finally, all bundle loaders are invoked again but to scan for regular bundles, again with the built-in
DandelionBundleLoaderin last
This particular order ensures that vendor bundles are always loaded in first and may be easily overriden by end-users using custom bundles.
Example
Let’s assume that two bundle loaders are registered in the Dandelion context: DandelionBundleLoader (registered by default) and CustomBundleLoader (classpath_root/dandelion/custom/vendor / classpath_root/dandelion/custom). At the application startup, Dandelion-Core will apply the following sequence:
-
the
CustomBundleLoaderwill scan for vendor bundles in its configured scanning path:classpath_root/dandelion/custom/vendor -
the
DandelionBundleLoaderwill scan for vendor bundles in its configured scanning path:classpath_root/dandelion/vendor -
the
CustomBundleLoaderwill scan for regular bundles in its configured scanning path:classpath_root/dandelion/custom -
the
DandelionBundleLoaderwill scan for regular bundles in its configured scanning path:classpath_root/dandelion
8.3. Bower integration
Starting from Dandelion-Core v1.1.0, Dandelion provides an integration with Bower components. The integration consists in scanning the downloaded bower_components folder for all bower.json manifests. Once scanned, all manifests are automatically converted into vendor bundles.
8.3.1. Location of the bower_components folder
Dandelion-Core resolves the location of the bower_components folder (the path in which installed components are saved) using the following strategy:
-
First, it checks if the
bower.components.locationoption is set in the configuration file.bower.components.location = bower_components (1)1 The location here refers to a folder within the web application directory. But it can be configured. -
Then, if no
bower.components.locationoption is set, Dandelion-Core scans for abower_componentsfolder within the web application directory, starting from the root -
Finally, if no
bower_componentsfolder is found within the web application, scans for it within the classpath
8.3.2. Conversion of bower.json files
Once the bower_components folder located, Dandelion-Core can start scanning for bower.json files. Each of these files will be automatically converted into a vendor bundle by applying a simple mapping:
| bower.json specification | Dandelion bundle specification |
|---|---|
|
|
For example, assuming the following Bower component for DataTables:
{
    "name": "datatables",
    "version": "1.10.7",
    "main": [
        "media/js/jquery.dataTables.js",
        "media/css/jquery.dataTables.css",
        "media/images/sort_asc.png",
        "media/images/sort_asc_disabled.png",
        "media/images/sort_both.png",
        "media/images/sort_desc.png",
        "media/images/sort_desc_disabled.png"
    ],
    "dependencies": {
        "jquery": ">=1.7.0"
    },
    "license": "MIT",
    "keywords": [
        "jquery",
        "datatables",
        "table",
        "javascript",
        "library"
    ],
    "ignore": [
        "/.*",
        "examples",
        "media/unit_testing",
        "composer.json",
        "dataTables.jquery.json",
        "package.json"
    ]
}
Dandelion-Core will map it to the following vendor bundle:
{
  "dependencies" : ["jquery"] (1)
  "bundle" : "datatables", (2)
  "assets" : [ (3)
    {
      "version" : "1.10.7",
      "locations" : {
         "webapp" : "/bower_components/media/js/jquery.dataTables.js" (4)
      }
    },
    {
      "version" : "1.10.7",
      "locations" : {
         "webapp" : "/bower_components/media/css/jquery.dataTables.css" (4)
      }
    }
   ]
}| 1 | The dependency here corresponds to the dependencies attribute of the Bower component |
| 2 | Both Bower component’s name and bundle’s name match |
| 3 | One asset per main item, filtering only JavaScript and CSS assets |
| 4 | Here the webapp location key is used because we consider that the bower_components folder has been scanned within the web application directory |
8.3.3. Examples
Assuming the following structure:
project-root
|__ src
   |__ main
      |__ webapp (1)
         |__ assets
|__ bower_components| 1 | The src/main/webapp folder of Maven projects is considered as the web application root directory |
You can either explicitely tells Dandelion where lives the Bower folder, by using the bower.components.location option as follows…
bower.components.location = /assets/bower_components-
or you can simply let Dandelion use the scanning strategy (TODO LIEN) and the
bower_componentsfolder will be scanned.
Now, let’s assume the following structure:
project-root
|__ src
   |__ main
      |__ resources (1)
         |__ assets
|__ bower_components| 1 | In other words, you prefer to save the Bower folder within the classpath. |
Once again, you can explicitely indicates Dandelion-Core where the Bower folder lives using the bower.components.location option…
bower.components.location = classpath:assets/bower_components (1)| 1 | Note the usage of the classpath: prefix, which tells Dandelion the configured resource lives in the classpath |
Both classpath: and file: prefix are supported. With the file: prefix, you must specify the absolute path of the bower_components folder.
|
8.4. Extending bundle loaders
You may wish to write an extension that uses its own bundle loader, e.g. if you wish to scan for bundles somewhere else than in the classpath. You might also need to use your own pre-loader. Let’s see here how to do it.
8.4.1. Plugging-in your own bundle pre-loader
In order to plug-in your own bundle pre-loader, follow these steps:
-
Create a class that extends
AbstractBundlePreLoader:package com.foo.bundle.loader.impl; public class FooPreLoader extends AbstractBundlePreLoader { @Override public String getName() { return "the-name-of-the-preloader"; (1) } @Override public List<BundleStorageUnit> getExtraBundles() { // Grab bundles and convert them into BundleStorageUnit return null; } }1 This name is mainly used for logging purpose -
In the
META-INF/servicesfolder, create a text file (UTF-8 encoded) using the following convention:Example with a Maven projectproject-root |__ src |__ main |__ resources |__ META-INF |__ services |__ com.github.dandelion.core.bundle.loader.PreLoaderInside this file, just add the fully qualified name of your own implementation. For example:
com.foo.bundle.loader.impl.FooPreLoader
And that’s all! Thanks to the SPI mechanism, Dandelion will automatically pick up your implementation on the next server restart.
8.4.2. Plugging-in your own bundle loader
In order to plug-in your own bundle loader, follow these steps:
-
Create a class that extends
AbstractBundleLoaderpackage com.foo.bundle.loader.impl; public class MyBundleLoader extends AbstractBundleLoader { private static final Logger LOG = LoggerFactory.getLogger(MyBundleLoader.class); public static final String LOADER_NAME = "custom-loader"; public static final String SCANNING_PATH = "dandelion/custom-path"; public DatatableBundleLoader(Context context, boolean isStandalone) { super(context, isStandalone); } @Override public String getName() { return LOADER_NAME; (1) } @Override protected Logger getLogger() { return LOG; } @Override public String getScanningPath() { return SCANNING_PATH; } }1 The loader name is used for logging purpose only -
In the
META-INF/servicesfolder, create a text file (UTF-8 encoded) using the following convention:Example with a Maven projectproject-root |__ src |__ main |__ resources |__ META-INF |__ services |__ com.github.dandelion.core.bundle.loader.BundleLoaderInside this file, just add the fully qualified name of your own implementation. For example:
com.foo.bundle.loader.impl.MyBundleLoader
And that’s all! Thanks to the SPI mechanism, Dandelion will automatically pick up your implementation and add it to the active bundle loaders on the next server restart.
9. Asset caching
Fetching something over the network is both slow and expensive: large responses require many roundtrips between the client and server, which delays when they are available and can be processed by the browser, and also incurs data costs for the visitor. As a result, the ability to cache and reuse previously fetched resources is a critical aspect of optimizing for performance.
https://developers.google.com/web/fundamentals/performance/optimizing-content-efficiency/http-caching
9.1. Introducing asset caching
Caching is one of the key issues of Dandelion-Core. Caching is involved at multiples levels, from server-side core functionalities such as asset locators to client browsers thanks to HTTP headers.
All caching mechanisms are described in this section.
9.1.1. Server-side caching
Server-side caching has two main purposes:
-
store the assocation between a request URI and its corresponding assets
-
store the asset contents
See the following four steps to understand how it works:
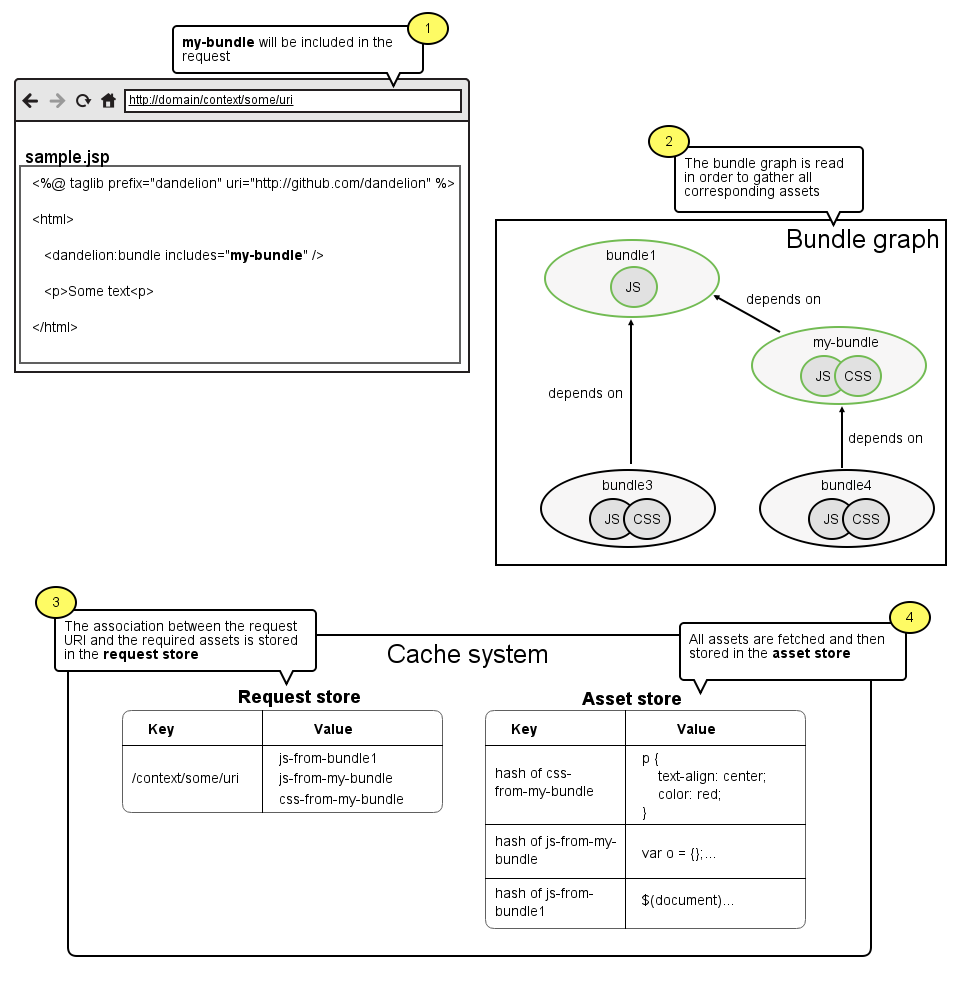
As you can see, a new entry is added in the request store on a per-page level. This looks quite aggressive but works in all cases. More fine-tuned strategies will be available in future versions.
9.1.2. Browser caching
As far as possible, Dandelion-Core helps the browser determine if and when it can reuse a previously fetched response. For this to happen, Dandelion-Core acts on server responses by specifying an explicit caching policy for each resource.
The caching policy is set through HTTP headers, whose value changes depending on the cache option.
| The caching policy of resources fetched from external locations, such as CDNs, is delegated to the external servers. |
The HTTP headers are set on all resources except those with the text/html content type.
| HTTP header | Caching enabled | Caching disabled |
|---|---|---|
|
public, max-age=31536000 |
no-cache, no-store |
|
current date + 1 year |
current date - 1 year |
|
start up time of the server |
|
|
Accept-Encoding |
Accept-Encoding |
Note that asset caching is enabled by default in the prod profile and disabled by default in the dev one
|
9.2. Built-in server-side cache systems
Dandelion-Core comes with two built-in server-side cache systems that are described below.
9.2.1. Memory
Dandelion uses the MemoryAssetCache service provider as the default implementation used for server-side caching.
Cache system name |
|
Service provider |
MemoryAssetCache |
This implementation uses two maps as stores, that use the LRU algorythm for the eviction of elements.
-
The first one caches asset contents.
-
The second one caches the association between a request URI and the requested assets
The max element of each of them can be configured thanks to the cache.max.size configuration option.
9.2.2. Ehcache
Alternatively, if you already use Ehcache in your application, it can be handy to use it as a main cache system for Dandelion-Core.
The dandelion-ehcache extra brings:
-
a new service provider for the AssetCache SPI
-
a dependency to the Ehcache project
Cache system name |
|
Service provider |
EhcacheAssetCache |
First, update your project by adding the following dependency:
<dependency>
  <groupId>com.github.dandelion</groupId>
  <artifactId>dandelion-ehcache</artifactId>
  <version>1.1.1</version>
</dependency>
Once the artifact available in your classpath, you need to tell Dandelion-Core that you want to use the service provider bundled inside.
For this purpose, update your configuration options as follows:
cache.name=ehcacheMoreover, note that you can specify the location of the ehcache.xml file using the cache.configuration.location configuration option.
9.3. Plugging-in your own cache system
Like most parts of the framework, Dandelion-Core provides an extension point allowing your to plug-in your own cache system thanks to the SPI mechanism.
In order to plug-in your own cache system, just follow these steps:
-
Create a class that extends
AbstractAssetCachepackage com.foo.asset.cache.impl; public class MyCacheSystem extends AbstractAssetCache { @Override public void initCache(Context context) { ... } @Override public String getCacheName() { return "myowncachesystem"; } @Override public String getAssetContent(String cacheKey) { ... } @Override public Set<Asset> getRequestAssets(String cacheKey) { ... } @Override public void storeAssetContent(String cacheKey, String assetContent) { ... } @Override public void storeRequestAssets(String cacheKey, Set<Asset> assets) { ... } @Override public void remove(String cacheKey) { ... } @Override public void clearAll() { ... } } -
In the
META-INF/servicesfolder, create a text file (UTF-8 encoded) using the following convention:Example with a Maven projectproject-root |__ src |__ main |__ resources |__ META-INF |__ services |__ com.github.dandelion.core.asset.cache.AssetCacheInside this file, just add the fully qualified name of your own implementation. For example:
com.foo.asset.cache.impl.MyCacheSystem
-
Configure Dandelion-Core to use your custom implementation thanks to the
cache.nameconfiguration option.cache.name=myowncachesystem
And that’s all! Dandelion, thanks to the SPI mechanism, will automatically pick up your implementation on the next restart.
10. Profiles
Dandelion profiles provide a way to segregate parts of your configuration and make it only available in certain environments.
10.1 Profile activation
In order to activate a profile, specify the following System property in the server startup script:
-Ddandelion.profile.active=[profileName]
For now, only system property-based activation is supported.
| At any moment, as long as the application is running, you can know which profile is active using the debugger. Read more about the debugger |
10.2. Built-in profiles
All existing configuration options are created with two values, one for the built-in dev profile, another for the prod one. Each of these profiles are described below.
10.2.1. dev profile
The main goal of the dev profile is to accelerate the development. As such, it is active by default.
All default dev features are listed in the configuration options reference but here follow some of them:
-
the Dandelion debugger is accessible, see the debugger section for more information
-
bundles can be re-scanned on-demand
-
a particular caching policy is applied thus preventing assets from being cached by browsers
-
all generated assets are pretty-printed, thus easing debugging
| This profile can be activated thanks to different aliases: dev and development. |
10.2.2. prod profile
The prod profile is focused both on performance and security. That is why it should be active in a production environment.
Here follow some of the features enabled with the prod profile:
-
specific HTTP headers are set in order to optimize load times (performance)
-
asset minification is enabled (performance)
-
GZIP compression is enabled for compatible MIME types (performance)
-
automatic versioning is enabled (performance)
-
the debugger is no longer accessible (security)
-
bundle can’t be reloaded any longer (security)
See the configuration options reference for the complete list of prod values.
| This profile can be activated thanks to different aliases: prod and production. |
10.3. Configuration subtitution
Note that profiles can also contain custom properties in order to use them in bundle definitions. This is particularly useful to handle deployments in multiple environments.
All custom configurations will be substituted in bundles using the following syntax: %CONFIGURATION_KEY%
Example
Consider the two following profiles: qa and prod.
# Dandelion options here
asset.minification=false
tool.gzip=false
tool.asset.pretty.printing=true

# Custom property here
media.server=http://qa-media.company.com/# Dandelion options here
asset.minification=true
tool.gzip=true
tool.asset.pretty.printing=false
# Custom property here
media.server=https://prod-media.company.com/You can then make use of the custom property in your bundle definitions with the following format: %media.server%
{
  "assets":[
    {
      ...,
      "locations":{
        "remote":"%media.server%/js/app.js"
      }
    }
  ]
}
Dandelion will perform the configuration substitution as soon as the application server starts.
10.4. Custom profiles
You can of course define your own profiles. It is as simple as creating a new properties file under the classpath_root/dandelion folder, with a specific name: dandelion_[profileName].properties
| All options not explicitely declared in your own profile file will be read from the built-in dev profile. |
project-root
|__ src
   |__ main
      |__ resources
         |__ dandelion
            |__ dandelion_[profileName].properties
Then, just activate it using the right system property:
-Ddandelion.profile.active=[profileName]
Except for the dev profile described ealier, as soon as a profile is activated, Dandelion-Core will read its configuration file at a specific location: classpath_root/dandelion/dandelion_[profileName].properties
|
11. Asset generators
One of the great features of Dandelion-Core is the ability to generate code. This feature is particularly handy when developing components such as Dandelion-Datatables, which require some code to initialize a client-side library.
Dandelion-Core only generates JavaScript code for now, but in multiple flavours.
11.1. JavaScript generators
11.1.1. Vanilla (or raw) JavaScript
This is the most simple asset generator available. As its name suggests, this generator is handy when you need to generate raw JavaScript code.
A basic built-in implementation is already available: RawJsContentGenerator:
public class RawJsContentGenerator extends AbstractJsContentGenerator {

   private AssetContent content;

   public RawJsContentGenerator(AssetContent content) {
      this.content = content;
   }

   ...
}
This implementation can be used as-is. If so, all you need is to instanciate AssetContent directly or to use a custom implementation where the contents of the asset must be returned by the getContent() method.
11.1.2. jQuery JavaScript
Dandelion-Core also contains a generator specifically designed for jQuery. This generator uses different placeholders around the jQuery .ready() event. Using this implementation will thus consist to fill the available placeholders with the desired JavaScript code.
Below are all existing placeholders:
// Beginning of the generated Javascript code
[BEFORE_ALL]

[BEFORE_START_DOCUMENT_READY]

$(document).ready(function() {
   [AFTER_START_DOCUMENT_READY]

   [COMPONENT_CONFIGURATION]

   [BEFORE_END_DOCUMENT_READY]
});

[AFTER_END_DOCUMENT_READY]

[AFTER_ALL]
// End of the generated Javascript code
As for raw JavaScript, Dandelion-Core ships a built-in implementation: JQueryJsContentGenerator. You can already use this implementation by implementing your own JQueryContent class.
The JQueryContent class contains all necessary utilities to fill the different placeholders:
appendToBeforeAll(String content)
appendToBeforeStartDocumentReady(String content)
appendToAfterStartDocumentReady(String content)
appendToComponentConfiguration(String content)
appendToBeforeEndDocumentReady(String content)
appendToAfterEndDocumentReady(String content)
appendToAfterAll(String content)
11.2. Binding a generator to an asset
In order to use an asset generator, you need to configure an asset with a particular location, whose key is api (see ApiLocator)
{
  "assets": [
    {
      "name" : "generated", (1)
      "type" : "js", (2)
      "locations": {
        "api": "uid"
      }
    }
  ]
}| 1 | the name attribute will used by Dandelion to generate the final HTML markup |
| 2 | the type attribute tells Dandelion-Core what kind of asset is to be generated |
Both name and type are mandatory when using the api location key
|
The most important part here is the configured location: uid.
Indeed, Dandelion-Core will look inside the current HttpServletRequest if an instance of AssetRequestContext is present. This utility is particularly useful to interact with the Dandelion context: include/exclude bundle, exclude assets AND configure asset generators.
In order to configure an asset generator, use the addGenerator(String uid, AssetContentGenerator generator) method as follows:
AssetRequestContext
   .get(this.request)
   .addGenerator("uid", any generator);
Finally, as soon as Dandelion-Core detects an api location key, it will look for a generator inside the current AssetRequestContext under the configured uid and invoke its getAssetContent() method.
12. Configuration options
One of the key features of Dandelion-Core is that it is highly configurable. Plenty of options, with default values depending on the active profile, are at your disposal to configure the framework.
12.1. Available options
See the configuration options reference for an exhaustive list of available options and their corresponding default value with both dev and prod profiles.
12.2. Reading configuration options
12.2.1. From classpath
By default, Dandelion-Core expects a file called dandelion.properties to be located in the classpath-root/dandelion folder.
project-root
|__ src
   |__ main
      |__ java
         |__ resources
            |__ dandelion
               |__ dandelion.properties
Note that when a profile is explicitely activated, Dandelion will try to load a file called dandelion_[profileName].properties. See the profile section for more information.
|
12.2.2. From System property
Dandelion-Core can also load an externalized configuration file, using the dandelion.configuration System property.
Example
Let’s consider the following structure:
C:
|__ Documents
   |__ MyApp
      |__ dandelion.properties
In order to read the externalized file, just add the -Ddandelion.configuration System property to the server starting script.
Note that when reading from an externalized file, you don’t have to place the properties file under the dandelion/ folder
|
12.3. Setting configuration options
All Dandelion configuration options can be set in different ways.
12.3.2. Using filter initialization parameters
You can also set configuration options as initialization parameters of the DandelionFilter:
<filter>
  <filter-name>dandelion</filter-name>
  <filter-class>com.github.dandelion.core.web.DandelionFilter</filter-class>
  <init-param>
    <param-name>tool.debugger</param-name>
    <param-value>true</param-value>
  </init-param>
</filter>13. Debugging tools
Dandelion-Core ships some live debugging tools that you may find useful during development.
13.1. Alert reporting
Since Dandelion-Core relies on asset bundles, it is extremely important to have quick feedback on potential errors when including bundles. Since the v1.0.0, Dandelion-Core has a basic alert reporting tool that will help you to debug as fast as possible.
13.1.1. Alert types
For now, only missing bundle will be reported but it will be enhanced in future versions.
13.1.2. Reporting mode
Several reporting modes are at your disposal:
-
console: any alert will be displayed in the JavaScript console of your browser
-
notification: a notification will be fired client-side
-
all (default in both dev and prod profiles): equivalent of console + notification
-
none: disables client-side alert reporting
The choice is set via the tool.alert.reporting.mode configuration option.
13.1.3. Enabling/disabling alert reporting
The reporting system can be enabled/disabled thanks to the tool.alert.reporting configuration option.
For example, in order to disable the reporting system, modify the configuration file as follows:
tool.alert.reporting = false13.2. Live debugger
In order to access the debugger, just append the following request parameter to the current URL: ddl-debug.
For example, if you are browsing the JSP starter sample at the URL: http://localhost:8080/core-jsp-starter/, just modify the URL as follows: http://localhost:8080/core-jsp-starter/?ddl-debug.
As a consequence, Dandelion-Core will display the debugger and show information about the current request.
Access to the debugger can be disabled thanks to the tool.debugger configuration option.
|
The Dandelion debugger is composed of several debug pages, which are described below.
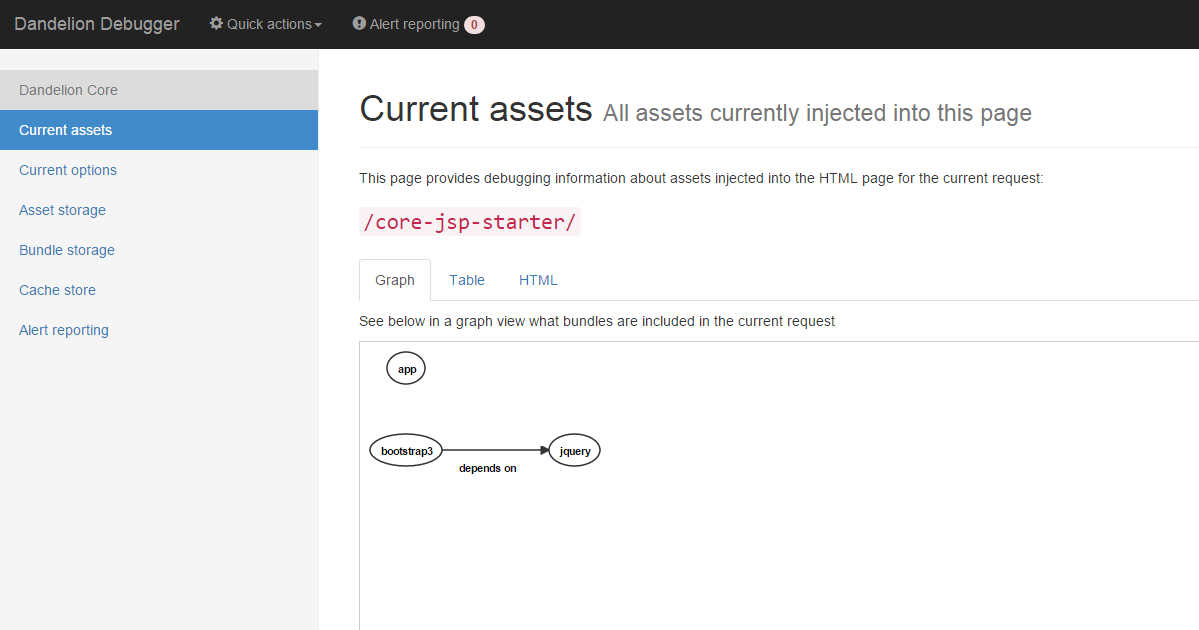
13.2.1. Current assets
This debug page allows you to understand how Dandelion-Core handles the included bundles. Several views are available:
-
graph: shows in a graph view what bundles are included in the current request
-
table: shows the same in a table view
-
HTML: shows how Dandelion-Core will generate HTML markup and where tags are to be included
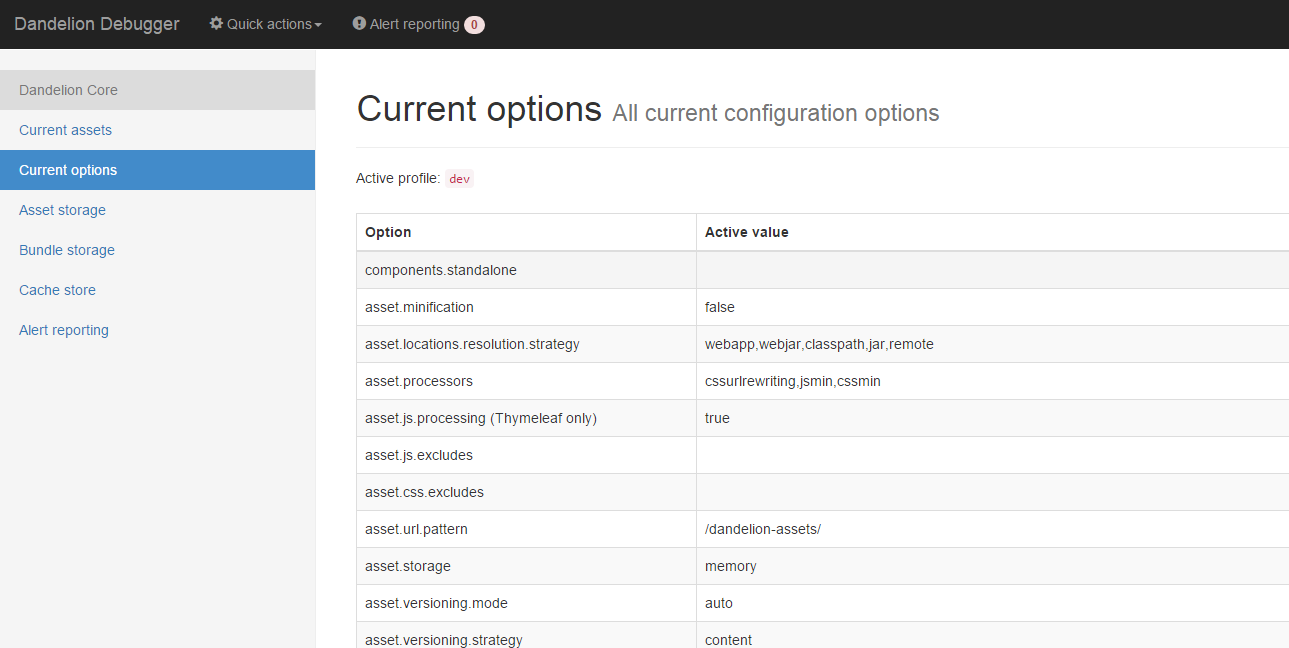
13.2.2. Current options
This debug page shows:
-
the active profile
-
all current active configuration options
13.2.3. Asset storage
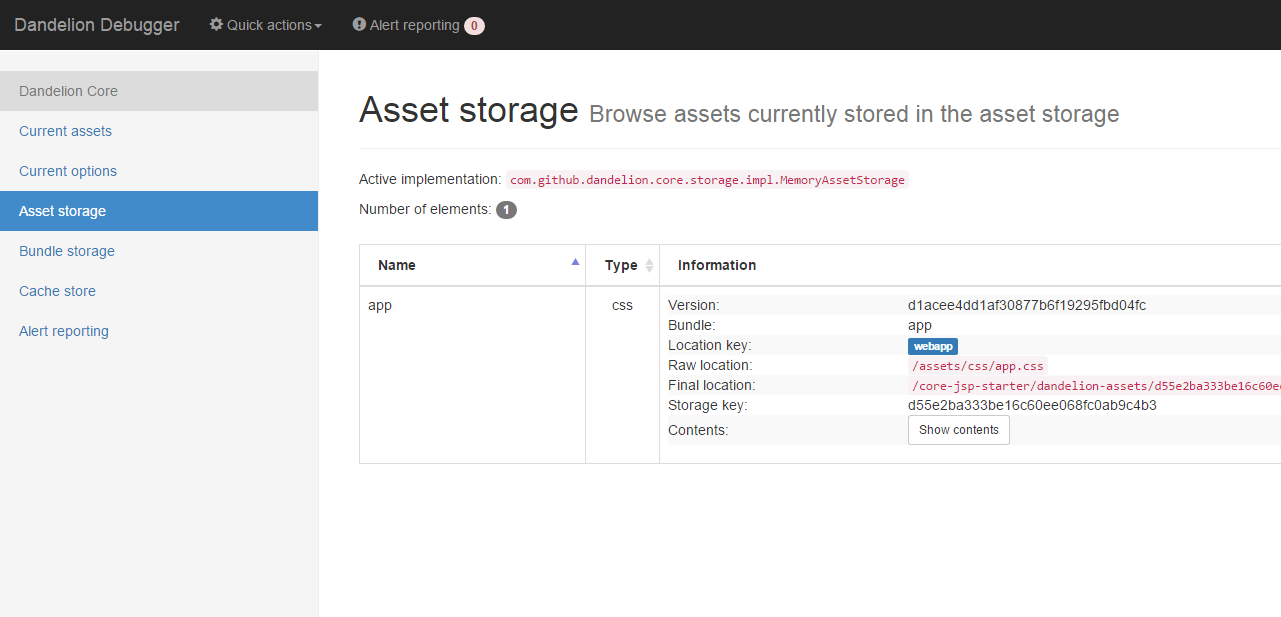
This debug page shows all assets stored in the asset storage, and all related metadata: version, parent bundle, …
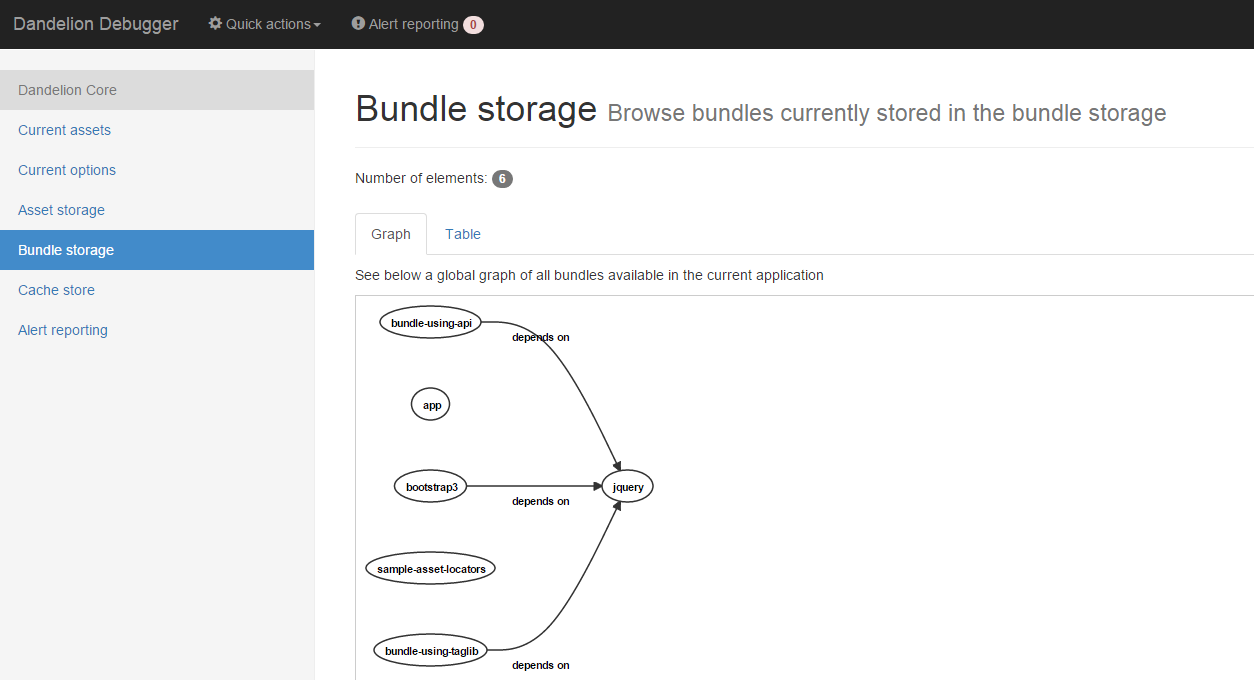
13.2.4. Bundle storage
This debug page shows all bundles stored in the bundle storage. Two views are available:
-
a graph view
-
a tabular view
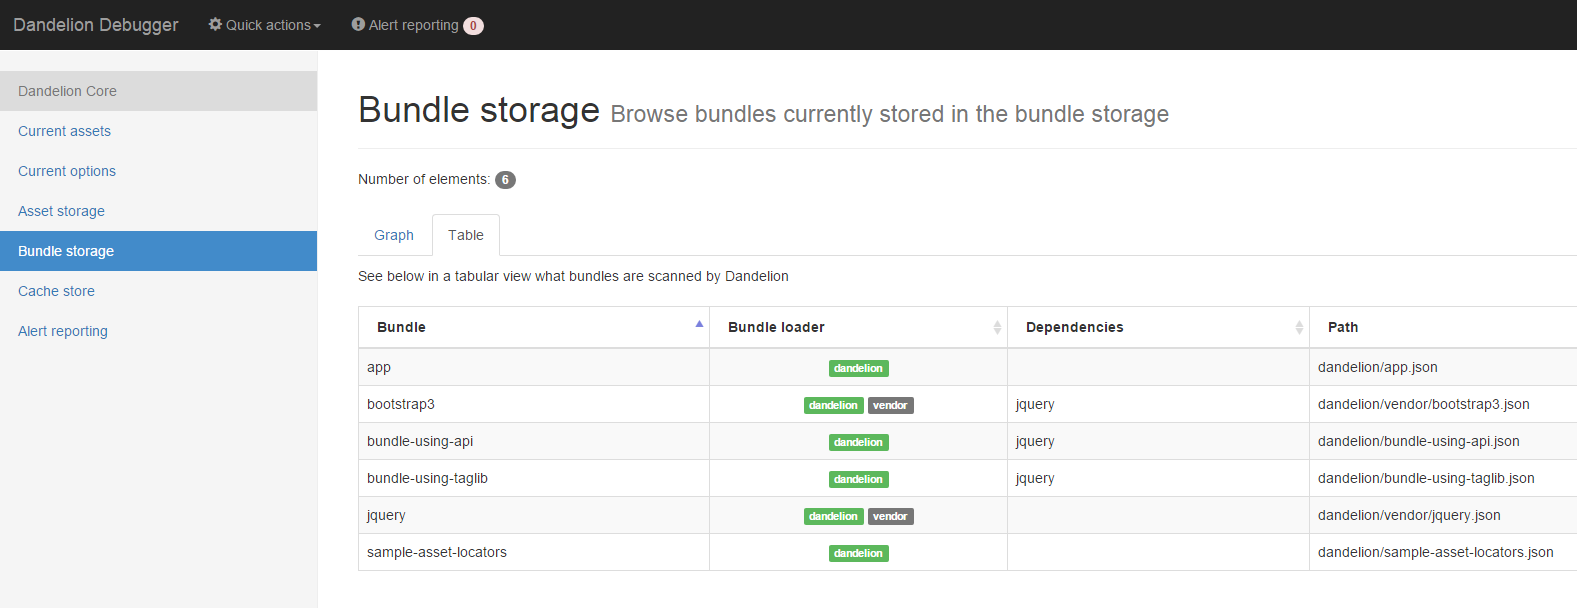
Note that the tabular view also displays more metadata about bundles: the original bundle loader (note that a vendor tag is displayed for vendor bundles), all bundle dependencies and the bundle original path.
13.2.5. Cache store
This debug page lets you visualize the contents of the cache store, that is all associations between request URIs and required assets.
13.2.6. Alert reporting
This debug page lets you visualize all alerts reported by Dandelion-Core.
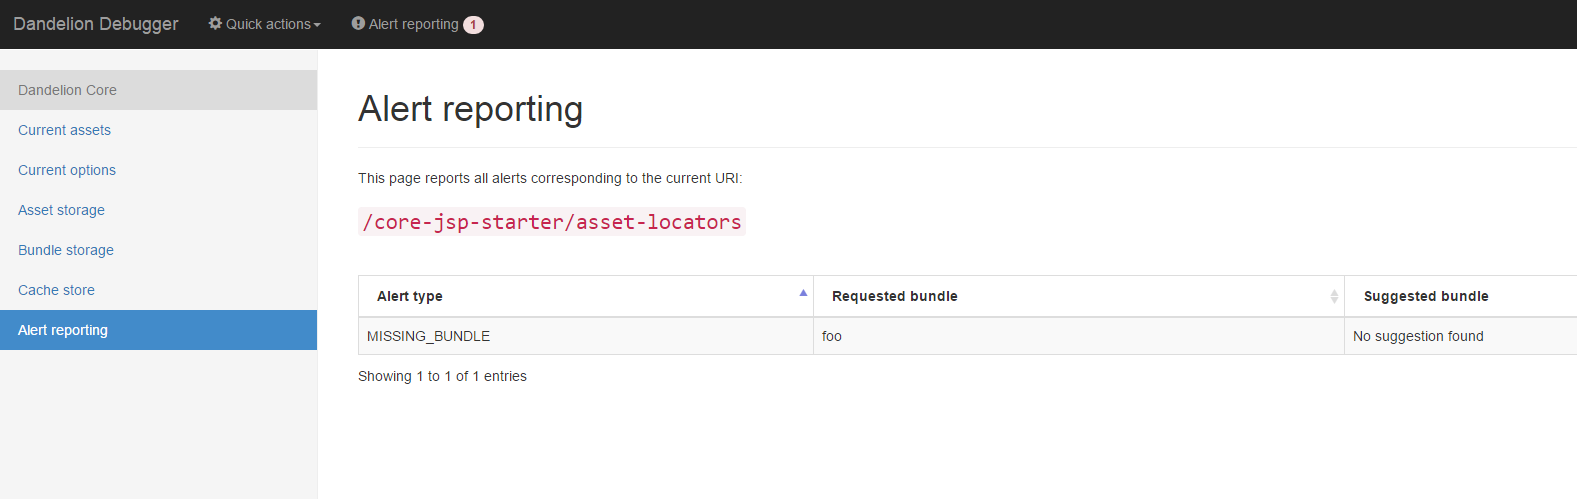
Note that when a requested bundle doesn’t exist in the bundle storage, Dandelion-Core checks whether any bundle exists with the same name. If so, all suggested bundles will be displayed in the last column.
14. Request/response handlers
As briefly explained in the introduction, Dandelion-Core is mainly based on a servlet filter: DandelionFilter. As most of existing filters, it is used to preprocess requests and postprocess responses, but in a modular manner that will be described in this section.
14.1. Pre-handlers, post-handlers and handler chain
The DandelionFilter does not directly processes requests and responses but delegates to a set of handlers. As the filter chain of the Servlet API, Dandelion-Core builds a handler chain at startup, which provides the same kind of mechanism as filters but for invoking a series of handlers, in a particular order.
A good sketch is better than words:
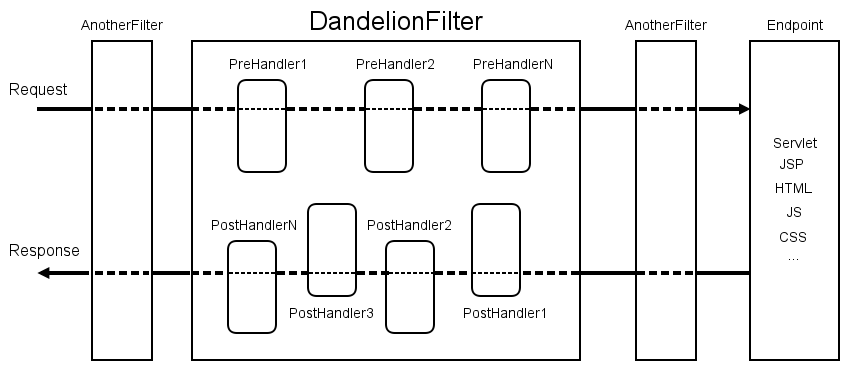
Note however that handlers fall into two categories:
-
pre-handlers: in charge of preprocessing requests
-
post-handlers: in charge of postprocessing responses
Each handler has its own role, which will be detailed in the next section.
14.2. Built-in pre-handlers
14.2.1. ReloadBundlePreHandler
| Type | Rank | Condition(s) | Role |
|---|---|---|---|
Pre-handler |
0 |
|
Reset the internal bundle storage by scanning all bundles and feed the bundle graph |
Note that the debugger has a Quick actions menu that trigger the bundle reloading using the above parameter.
14.2.2. ClearCachePreHandler
| Type | Rank | Condition(s) | Role |
|---|---|---|---|
Pre-handler |
0 |
|
Clear the configured cache system |
14.2.3. ClearStoragePreHandler
| Type | Rank | Condition(s) | Role |
|---|---|---|---|
Pre-handler |
0 |
|
Clear the configured asset storage system |
| Note that the rank of built-in pre-handlers doesn’t matter, since they’re all used to perform one shot actions. |
14.3. Built-in post-handlers
14.3.1. ProcessJsPostHandler (Thymeleaf only)
| Type | Rank | Condition(s) | Role |
|---|---|---|---|
Post-handler |
2 |
|
Processes any Thymeleaf expression in JavaScript assets. Note that request attributes are also made available when processing the assets |
*Compatible content types: application/x-javascript, application/javascript, text/javascript, text/ecmascript, application/ecmascript, text/jscript
This handler is automatically registered when using Thymeleaf.
14.3.2. ETagPostHandler
| Type | Rank | Condition(s) | Role |
|---|---|---|---|
Pre-handler |
10 |
All content types except |
Sends a HTTP 304 (NOT MODIFIED) if the request ETag equals the response ETag, thus saving bandwith (not server performance) |
14.3.3. AssetInjectionPostHandler
| Type | Rank | Condition(s) | Role |
|---|---|---|---|
Pre-handler |
20 |
|
Perform the asset injection within HTTP responses |
14.3.4. GzipCompressionPostHandler
| Type | Rank | Condition(s) | Role |
|---|---|---|---|
Pre-handler |
30 |
|
Compress text-based resources using GZIP |
*Compatible content types: text/html, text/css, application/x-javascript, application/javascript, text/javascript, text/plain, text/xml, application/xhtml+xml, image/svg+xml
14.3.5. ReportAlertPostHandler
| Type | Rank | Condition(s) | Role |
|---|---|---|---|
Pre-handler |
30 |
|
Update the response with potential alerts |
14.3.6. CacheHeaderPostHandler
| Type | Rank | Condition(s) | Role |
|---|---|---|---|
Pre-handler |
40 |
All content types except |
Position HTTP headers on responses |
14.3.7. DebuggerPostHandler
| Type | Rank | Condition(s) | Role |
|---|---|---|---|
Pre-handler |
50 |
|
Override the response with the live debugger |
14.4. Plugging-in your own handler
In order to plug-in your own handler, follow these steps:
-
Create a class that extends
AbstractHandlerChainpackage com.foo.handler.impl; @Override public boolean isAfterChaining() { // true for post-handlers, false for pre-handlers return false; (1) } @Override public int getRank() { return 0; (2) } @Override public boolean isApplicable(HandlerContext context) { return false; (3) } @Override protected Logger getLogger() { return null; (4) } @Override protected boolean handle(HandlerContext context) { // Processes the request/response return false; (5) }1 This handler is considered as a pre-handler 2 Set the rank with which the handler will be executed in the chain 3 Configure the conditions under which this handler applies 4 Return the logger if you need logging 5 Perform the request processing here. The return value is a boolean that indicates whether the handler chain should continue handling the request/response or not -
In the
META-INF/servicesfolder, create a text file (UTF-8 encoded) using the following convention:Example with a Maven projectproject-root |__ src |__ main |__ resources |__ META-INF |__ services |__ com.github.dandelion.core.web.handler.HandlerChainInside this file, just add the fully qualified name of your own implementation. For example:
com.foo.handler.impl.MyHandler
And that’s all! Thanks to the SPI mechanism, Dandelion will automatically pick up your implementation and insert it in the handler chain at the position defined by its rank.
Appendix A: JSP taglib reference
A.1. <dandelion:bundle> tag
The <dandelion:bundle> tag allows you to include bundles in (or exclude them from) the current HTTP request.
Usage
In order to include a bundle to the current HTTP request, use the includes attribute as follows:
<%@ taglib prefix="dandelion" uri="http://github.com/dandelion" %>
...
<dandelion:bundle includes="bundle-to-include, another-bundle-to-include" />
...
In the same way, use the excludes attribute as follows to exclude a bundle from the current HTTP request:
<%@ taglib prefix="dandelion" uri="http://github.com/dandelion" %>
...
<dandelion:bundle excludes="bundle-to-exclude" />
...
Reference
| Attribute | Description |
|---|---|
Comma-separated list of bundles to include in the current HTTP request |
|
Comma-separated list of bundles to exclude from the current HTTP request |
A.2. <dandelion:asset> tag
The <dandelion:asset> tag allows you to exclude assets (JS and/or CSS) from the current HTTP request.
Usage
In order to exclude one JS asset from the current request, use the jsExcludes as follows:
<%@ taglib prefix="dandelion" uri="http://github.com/dandelion" %>
...
<dandelion:asset jsExcludes="js-asset-to-exclude, another-js-asset-to-exclude" />
...
And in order to exclude one CSS asset from the current HTTP request, use the cssExcludes as follows:
<%@ taglib prefix="dandelion" uri="http://github.com/dandelion" %>
...
<dandelion:asset cssExcludes="css-asset-to-exclude" />
...
Reference
| Attribute | Description |
|---|---|
Comma-separated list of JS asset names to exclude from the current HTTP request |
|
Comma-separated list of CSS asset names to exclude from the current HTTP request |
A.3. <dandelion:placeholder> tag
The <dandelion:placeholder> tag allows you to configure custom placeholders that Dandelion-core will use to perform assets injection.
Usage
By default, Dandelion-Core injects <script> tags at the end of the <body> section and <link> tags at the end of the <head> section. But in the example below, the injection is performed where the <dandelion:placeholder> tag is used.
<%@ taglib prefix="dandelion" uri="http://github.com/dandelion" %>
<html>
  <head>
    ...
  </head>
  <body>
    ...
    <div>
      <dandelion:placeholder type="js" /> (1)
    </div>
  </body>
</html>| 1 | Since the type attribute is set to js, all JavaScript assets will be included in the surrounding div |
|
A few rules need apply:
|
Reference
| Attribute | Description | Possible values |
|---|---|---|
Type of placeholder to configure (Required) |
|
Appendix B: Thymeleaf dialect reference
B.1. ddl:bundle* attributes
The ddl:bundle* attributes allow you to include bundles in (or exclude them from) the current HTTP request.
Usage
In order to include a bundle to the current HTTP request, use the ddl:bundle-includes attribute as follows:
<!DOCTYPE html>
<html xmlns:th="http://www.thymeleaf.org" xmlns:ddl="http://www.thymeleaf.org/dandelion">
  <head ddl:bundle-includes="bundle-to-include, another-bundle-to-include">
    ...
  </head>
  <body>
    ...
  </body>
</html>
In the same way, use the ddl:bundle-excludes attribute as follows to exclude a bundle from the current HTTP request:
<!DOCTYPE html>
<html xmlns:th="http://www.thymeleaf.org" xmlns:ddl="http://www.thymeleaf.org/dandelion">
  <head ddl:bundle-excludes="bundle-to-exclude">
    ...
  </head>
  <body>
    ...
  </body>
</html>
Both ddl:bundle-includes and ddl:bundle-excludes attributes can be used on any HTML tag.
|
Reference
| Attribute | Description |
|---|---|
Comma-separated list of bundles to include in the current HTTP request |
|
Comma-separated list of bundles to exclude from the current HTTP request |
B.2. ddl:asset* attributes
The ddl:asset* attributes allow you to exclude assets (JS and/or CSS) from the current HTTP request.
Usage
In order to exclude one JS asset from the current request, use the ddl:asset-js-excludes as follows:
<!DOCTYPE html>
<html xmlns:th="http://www.thymeleaf.org" xmlns:ddl="http://www.thymeleaf.org/dandelion">
  <head>
    ...
  </head>
  <body ddl:asset-js-excludes="js-asset-to-exclude, another-js-asset-to-exclude">
    ...
  </body>
</html>
And in order to exclude one CSS asset from the current HTTP request, use the ddl:asset-css-excludes as follows:
<!DOCTYPE html>
<html xmlns:th="http://www.thymeleaf.org" xmlns:ddl="http://www.thymeleaf.org/dandelion">
  <head>
    ...
  </head>
  <body ddl:asset-css-excludes="css-asset-to-exclude">
    ...
  </body>
</html>
As ddl:bundle* attributes, ddl:asset* attributes can be used on any HTML tag.
|
Reference
| Attribute | Description |
|---|---|
Comma-separated list of JS asset names to exclude from the current HTTP request |
|
Comma-separated list of CSS asset names to exclude from the current HTTP request |
B.3. ddl:placeholder* attributes
The ddl:placeholder* allows you to configure custom placeholders that Dandelion-core will use to perform assets injection.
Usage
By default, Dandelion-Core injects <script> tags at the end of the <body> section and <link> tags at the end of the <head> section. But in the example below, the injection is performed where the <ddl:placeholder*> attributes are used.
<!DOCTYPE html>
<html xmlns="http://www.w3.org/1999/xhtml"
      xmlns:th="http://www.thymeleaf.org"
      xmlns:layout="http://www.ultraq.net.nz/web/thymeleaf/layout"
      xmlns:ddl="http://www.thymeleaf.org/dandelion">
<head>
  <title layout:title-pattern="$DECORATOR_TITLE - $CONTENT_TITLE">App</title>

  <style ddl:placeholder-replace="css"/> (1)

  <div layout:fragments="styles">
    <p>optional style and link tags</p>
  </div>
</head>
<body>
  <div th:include="common/fragments/main-menu :: top-menu">Top Menu</div>

  <div layout:fragment="content" class="container">
    <p>Page content goes here</p>
  </div>

  <div ddl:placeholder-include="js"> (2)
    <p>Dandelion injects script tags here</p>
  </div>

  <div layout:fragment="scripts">
    <p>optional script tags</p>
  </div>
</body>
</html>| 1 | Dandelion-Core will inject all <link> tags by replacing the <style> tag |
| 2 | Here Dandelion-Core will inject all <script> tags inside the div |
|
A few rules need apply:
|
Reference
| Attribute | Description | Possible values |
|---|---|---|
Placeholder where to inject the specified asset type. Assets will be injected into the corresponding element. |
|
|
Placeholder where to inject the specified asset type. Assets will replace the corresponding element. |
|
Appendix C: Configuration options reference
The table below lists all available configuration options.
Note that all options are presented in the following format:
option.name |
Description of the option |
|
Values |
All possible values |
|
dev |
The default value configured in the dev profile |
|
prod |
The default value configured in the prod profile |
|
Reference
Component-related options |
||
Allows components to be used standalone. If a component is used standalone, its corresponding bundle loader will be disabled. |
||
Values |
Comma-separated list of component ids |
|
dev |
||
prod |
||
Asset-related options |
||
Enable or disable asset minification |
||
Values |
true | false |
|
dev |
false |
|
prod |
true |
|
Locations resolution strategy to be used when multiple locations are specified for an asset |
||
Values |
Comma-separated list of location keys. See the asset locators section for more information. |
|
dev |
webapp, webjar, classpath, jar, file, remote |
|
prod |
webapp, webjar, classpath, jar, file, remote |
|
List of asset processors globally enabled in the application |
||
Values |
Comma-separated list of processor names to be used |
|
dev |
cssurlrewriting, jsmin, cssmin |
|
prod |
cssurlrewriting, jsmin, cssmin |
|
Whether JavaScript assets should be processed with Thymeleaf expressions |
||
Values |
true | false |
|
dev |
true |
|
prod |
true |
|
Comma-separated list of JavaScript assets to exclude from the current request |
||
Values |
Comma-separated list of asset names |
|
dev |
||
prod |
||
Comma-separated list of CSS assets to exclude from the current request |
||
Values |
Comma-separated list of asset names |
|
dev |
||
prod |
||
Servlet pattern to be used by the DandelionServlet to serve assets |
||
Values |
Any valid URL pattern |
|
dev |
/dandelion-assets/ |
|
prod |
/dandelion-assets/ |
|
Name of the implementation to be used for the |
||
Values |
The name of the implementation of |
|
dev |
memory |
|
prod |
memory |
|
Versioning-related options |
||
Versioning mode to be used for assets |
||
Values |
auto | manual |
|
dev |
auto |
|
prod |
auto |
|
Versioning strategy to be applied on assets when the versioning mode is |
||
Values |
content | fixed |
|
dev |
content |
|
prod |
content |
|
Type of fixed version to be used for all assets when the |
||
Values |
string | date |
|
dev |
string |
|
prod |
string |
|
Value of the version to be used for all assets when the |
||
Values |
Any string when |
|
dev |
UNDEFINED_VERSION |
|
prod |
UNDEFINED_VERSION |
|
Date pattern to be used when the |
||
Values |
Any valid date pattern |
|
dev |
yyyyMMdd |
|
prod |
yyyyMMdd |
|
Caching-related options |
||
Enable or disable caching |
||
Values |
true | false |
|
dev |
false |
|
prod |
true |
|
Name of the cache system to use |
||
Values |
The name of any available cache system |
|
dev |
memory |
|
prod |
memory |
|
Maximum number of request/assets entries stored in the configured cache system |
||
Values |
Any positive number |
|
dev |
500 |
|
prod |
500 |
|
Path to a configuration file used by a third-party cache system, e.g. ehcache.xml. |
||
values |
Any class that implements com. github. dandelion. datatables. core. export. DatatablesExport |
|
dev |
||
prod |
||
Bundle-related options |
||
Root location (in the classpath) of bundles |
||
values |
Any valid location |
|
dev |
||
prod |
||
Bundle(s) to include in all requests of the application |
||
Values |
Comma-separated list of bundle names |
|
dev |
||
prod |
||
Bundle(s) to exclude from all request of the application |
||
Values |
Comma-separated list of bundle names |
|
dev |
||
prod |
||
Enable/disable all pre-loaders. See the bundle loader section. |
||
Values |
true | false |
|
dev |
true |
|
prod |
true |
|
Tooling-related options |
||
Enable or disable GZIP compression of |
||
Values |
true | false |
|
dev |
false |
|
prod |
true |
|
MIME types that will be gzipped |
||
Values |
Comma-separated list of MIME types |
|
dev |
text/html, text/css, application/x-javascript, application/javascript, text/javascript, text/plain, text/xml, application/xhtml+xml, image/svg+xml |
|
prod |
text/html, text/css, application/x-javascript, application/javascript, text/javascript, text/plain, text/xml, application/xhtml+xml, image/svg+xml |
|
Allow or disallow the access to the debugger |
||
Values |
true | false |
|
dev |
true |
|
prod |
false |
|
Enable or disable alert reporting |
||
Values |
true | false |
|
dev |
true |
|
prod |
false |
|
Mode of alert reporting |
||
Values |
console | notification | all | none |
|
dev |
all |
|
prod |
all |
|
Allow or disallow bundle reloading |
||
Values |
true | false |
|
dev |
true |
|
prod |
false |
|
Enable or disable pretty printing of generated asset (those configured with the |
||
Values |
true | false |
|
dev |
true |
|
prod |
false |
|
Monitoring-related options |
||
(beta) Enable or disable JMX monitoring |
||
Values |
true | false |
|
dev |
false |
|
prod |
false |
|
Package managers-related options |
||
Location of the |
||
Values |
Any location, either without prefix (scanning within the web app root directory), or with a |
|
dev |
||
prod |
||
Misc configuration options |
||
Encoding to be used by Dandelion for several purposes: HTML injection, asset processing, … |
||
Values |
Any valid charset name |
|
dev |
UTF-8 |
|
prod |
UTF-8 |
|